Voxel.js Next
Check out the voxel.js reboot, April 2019
Just wanted to leave a quick note on my inactive blog for any Voxel.js fans out there: Mozillian and Fellow Oregonian Josh Marinacci has been working on porting the now 5 year old Voxel.js codebase to work in modern browsers.
He's calling his reboot Voxel.js Next, and is working on the project because his nine year old son is a huge Minecraft fan and keeps bugging him to make a web based version.
You can check out Voxel.js Next on the Mozilla Mixed Reality Blog here.
]]>Getting Started With Node For Distributed Systems
Where to get started with streams and peer to peer, May 2016
The great thing about node (and it's streams) is that its easy to plug different modules together into powerful pipelines.
For example in Dat we use rabin to chunk a file stream and then pipe into a merkle tree generator (merkle-tree-stream):
var merkle = require('merkle-tree-stream')
var rabin = require('rabin')
var fs = require('fs')

fs.createReadStream('big.file')
  .pipe(rabin())
  .pipe(merkle())
  .on('data', function (data) {
    console.log('tree node', data)
  })
It's basically unix pipes all over again. To work with streams in various ways, try out the mississippi module. For node and streams skill building, NodeSchool is great for an intro to most of the skills you will need.
After getting through NodeSchool, this P2P workshop by mafintosh is a good challenge. It's doable once you have a basic knowledge of Node.
In the workshop you build a peer to peer chat system piece by piece using network streams, DNS, LevelDB and append-only log based message replication. It's best to try with friends, so you can chat with each other as you go through the lessons.
For some authors who write distributed systems modules, start with these (not an exhaustive list by any means):
]]>What's the deal with iot.js and JerryScript
Node.js will soon be running on tiny low power chips.
iot.js is a Node.js compatible runtime being written by Samsung. The project is still in active development, is open source and Apache Licensed. It hasn't yet had a stable release but has been in development for over a year. It is built on a new JavaScript VM called JerryScript (named after Jerry Mouse) that they are also working on. Node.js is built on V8, and iot.js is built on JerryScript. The major goal of iot.js is to run Node code on low power devices.
JerryScript doesn't have a logo yet, so I made one:

The current hardware requirements for iot.js are around 350KB ROM and 100KB RAM. This is a huge difference compared with V8, the VM that Node.js is built on, which is notoriously memory hungry and doesn't run on devices with less than 64MB of RAM (the lowest power device I've seen running it is the Arduino Yun).
As you can see on their wiki and the current implementation, iot.js is a Node.js compatible JS + C runtime that binds to JerryScript.
The first two officially supported devices are the STM32F4-Discovery and the Raspberry Pi 2:
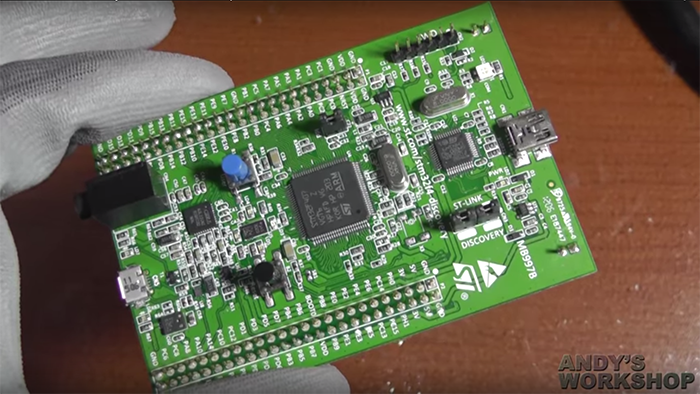
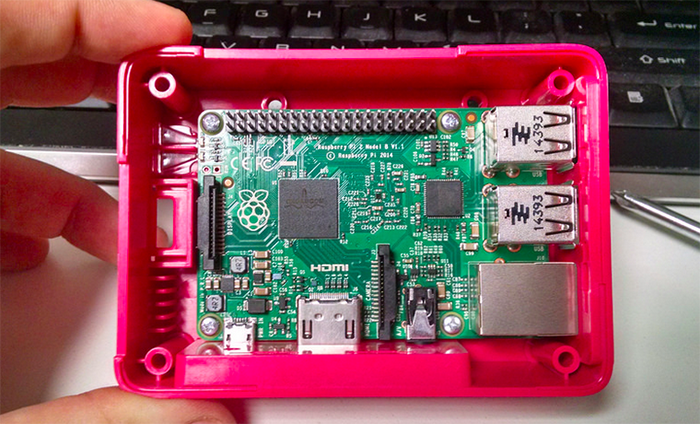
The exciting thing about this stuff is that it makes low power hardware more accessible to coders like me who know JS and can install modules from NPM but don't want to deal with C and compiled language tooling and debugging headaches.
I've done a number of projects with the Arduino which can't run Node but has great battery life, and the Raspberry Pi which can run Node but has poor battery life and requires Linux sysadmin skills to operate effectively. The Raspberry Pi (or any Linux machine) is totally overkill for a lot of the projects I'm interested in doing (e.g. a computer that lives on my bicycle, or on that sits in my garden measuring soil moisture levels). Low power node.js seems like the sweet spot for me - I can leverage the Node + NPM ecosystem to deploy stuff to hardware that can potentially run for weeks on a single charge.
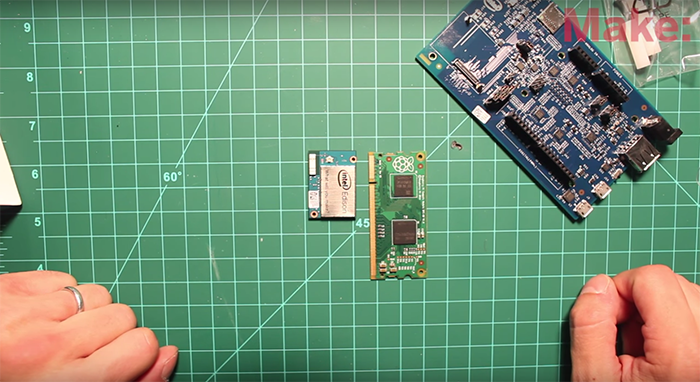
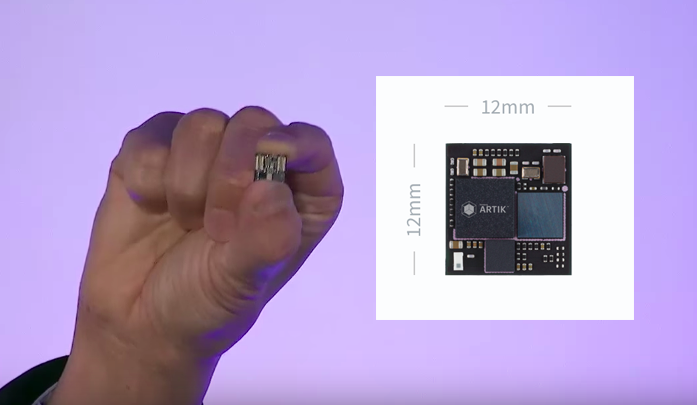
In the future they will work on support for other devices (according to their wiki), including the Intel Edison and Samsungs recently announced Artik 1.
Perhaps the closest thing to iot.js is Espruino, who both develop a custom JavaScript runtime as well as manufacture development boards like the Espruino Pico. The major difference between iot.js and Espruino is that Espruino is not Node.js compatible. The Espruino boards use a family of chips (STM32F4) that iot.js supports, so it should be possible to run iot.js on Espruino hardware in the future.
In addition to JerryScript and Espruino there is also Duktape which is "an embeddable Javascript engine, with a focus on portability and compact footprint". There is a project called Duklove that combines Duktape and LibUV, which in the future could form the basis of a Node.js compatible runtime build on top of Duktape.
It would be interesting to get the authors of JerryScript, Espruino and Duklove to sit down and talk to each other.
Another similar device is the ESP8266, which is a low power microcontroller with an integrated WiFi networking stack. They are really cheap - you can get ESP8266 development boards for around $8 from Amazon or the raw chips in bulk for around $2 a piece. However, with only 64KB of RAM and ROM it is not quite beefy enough to run iot.js. The closest thing you can get is Lua through a project called NodeMCU or the μScript project.
I think a low power Node.js runtime is long overdue and am looking forward to the first stable iot.js release.
]]>Electron Fundamentals
A quick intro to Electron, a desktop application runtime.
Electron is an open source project written by Cheng Zhao AKA zcbenz, an engineer who works for GitHub in Beijing on the Atom text editor team. It combines Chromium and Node into a single runtime suitable for building custom desktop web applications that also have access to Node for things that web browsers normally can't do.
Before starting Electron zcbenz contributed heavily to the node-webkit (now called nw.js) project. Electron is conceptually similar to nw.js but has some important technical differences which are explained here. A key difference is that Electron uses Googles Chromium Content Module to bring in Chromium functionality vs nw.js which uses a forked version of Chromium itself.
It's a runtime
Electron is a runtime, just like node. This means instead of running node app.js you run electron app.js. To make installing the Electron runtime easier I created a module called electron-prebuilt that downloads the latest release of Electron and installs it in your CLI path as electron.
$ npm install electron-prebuilt -g
Downloading electron-v0.30.0-darwin-x64.zip
[=================================================>] 100.0% of 37.07 MB (3.53 MB/s)

$ electron -v
v0.30.0
I'd also like to give a shoutout to John Muhl who wrote electron-prebuilt-updater, which runs on a free Heroku server, listens for GitHub Releases on Electron with a WebHook and automatically does an NPM publish to electron-prebuilt with the new release. It's an awesome bit of automation that has saved me a lot of maintenance time!
My favorite part of Electron is that it combines Node and Chromium into a single context. This means you can write code like this:
// require a C++ module in a browser!
var leveldb = require('level')

// open the database on the real HD
var db = leveldb('./data')

db.get('maxogden-profile', function (err, profile) {
  if (err) throw err

  // render data to the DOM
  document.body.appendChild(JSON.stringify(profile))
})
Normally to get require in the browser you have to use browserify to transform your code. In Electron apps require is already defined along with process and all of the other Node globals as well as window, document and all of the browser globals. Again, this is because Electron combines a Node JS context with a Chromium JS context. Anything you can do in Node and/or Chromium you can do in Electron.
Electron is low level
The Electron API, similar to Node, is designed to support a rich userland of modules and applications. I was able to write a module called menubar that hides much of the complexity of the Electron API from you and lets you make a 'menubar' style app (e.g. Dropbox) in just a few lines of code. Check out the source code for menubar itself to get an idea of how you might wrap the Electron API in a higher level module (just like you would do with Node).
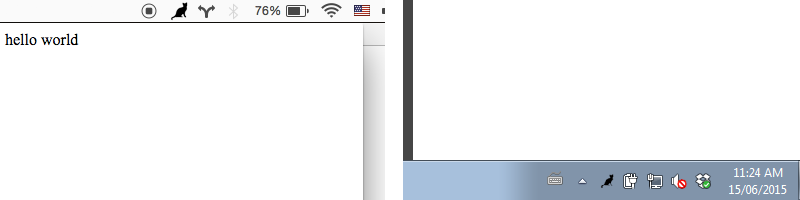
Apps work cross-platform
Node itself has supported Mac, Windows and Linux equally since version 0.6, and Chromium is also cross platform. The Electron API philosophy is that it only adds support for features that can work on all platforms. For example, Windows has a 'system tray' but Mac OS has a 'menubar'. Electron implements an abstraction over these called the 'Tray' API that is generic enough to function on whatever platform it is running on. Here's the same app running on Mac and Windows (using a Cat icon):
Electron itself doesn't include a way to package your code into a executable (e.g. a .app for Mac or a .exe for Windows), so I wrote a module called electron-packager that lets you build Mac, Windows or Linux apps from your source code.
$ electron-packager /src/my-electron-foobar-app FooBar --platform=darwin --arch=x64 --version=0.25.1
App examples
There are some big companies using Electron (in additon to GitHub). Notably Microsoft with their VisualStudio Code editor and Faceboook with their Nuclide editor. However, Electron can be used for lots of things besides Code editors.
Myself and some friends have worked on a few apps in our spare time, just to get acquainted with Electron. Along the way I've opened ~20 issues on the Electron repo when I got stuck and have got a response from zcbenz on each one. Some turned out to be bugs, some were feature requests that got implemented, and others turned into discussions that helped me find workaround.
Playback
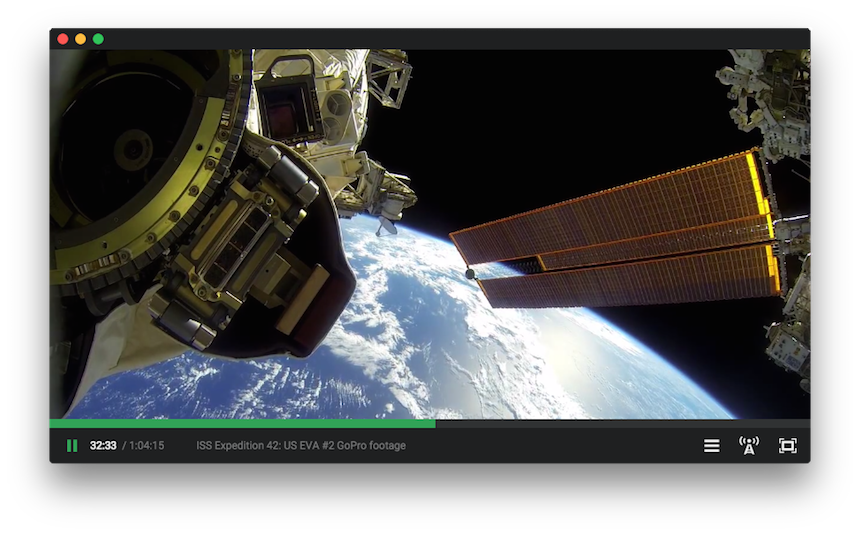
Playback is an experiment in trying to write an app like VLC but based on web technologies. Some notable features include the ability to stream movies directly from Torrent files and Chromecast integration, all done with Node modules!
Monu
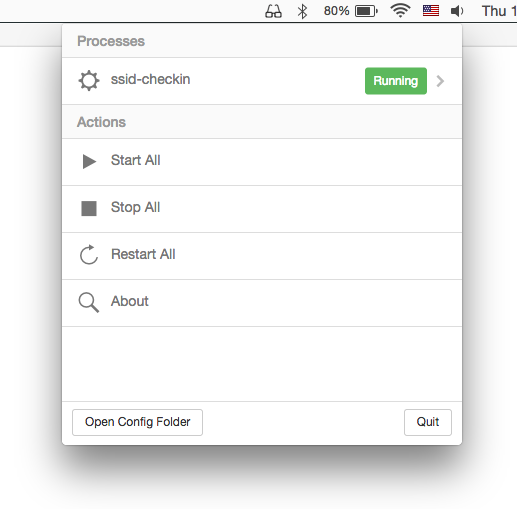
Monu is a menubar app that wraps a process monitor in a little UI. It lets me run persistent command-line processes on my machine, much like I would do with upstart or even cron on a Linux server. It was something I've wanted to make for a while and was a good way to get to know Electron. I use it to run ssid-checkin which logs me into Foursquare when I join known WiFi hotspots.
ScreenCat
ScreenCat is a screen/keyboard/mouse sharing + voice chat app that uses WebRTC. If you have ScreenCat running you can share your screen with someone else who has ScreenCat, or you can share your screen with someone in a WebRTC enabled web browser. It's a little rough around the edges, but I use it to do remote pair programming with coworkers from time to time.
Friends
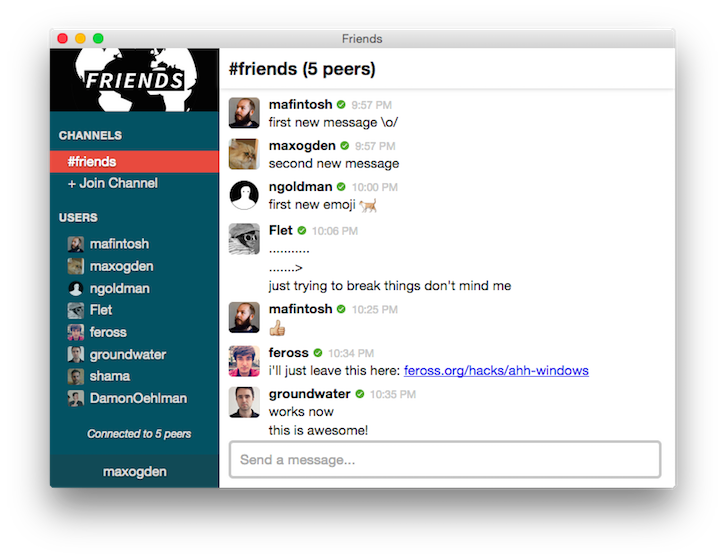
Friends is a highly experimental decentralized public chat app, similar to Slack or IRC but built entirely on WebRTC Peer-to-Peer systems so it doesn't depend on a central server -- all messages are exchanged directly between users. It's totally pre-alpha quality, so don't expect it to be easy to run just yet, but it has been a fun way to play with WebRTC and Node together.
Electron Microscope
This one isn't an app per-se, but I'm working on a web scraping/spidering tool based on Electron called Electron Microscope. It adds an automation + data streaming API to Electron browser windows to visit, interact with, and stream data out of websites. If you're interested in giving it a spin I'd appreciate API feedback.
Summary
Given that Electron is a young open source project largely maintained by a single individual I think it's off to a great start. Browsers are complex beasts and I believe, given the interest it has had so far, that Electron will grow into a healthy open source source project with many core contributors and even better cross platform support.
I should note that I don't work at GitHub, I just like Node and Chromium and hence got excited about Electron and have written a few 'missing utilities' to automate Electron workflows. I encourage you to do the same if you get the chance, or to get involved with any of my utilities as they are all open source projects.
For more Electron resources you should check out the awesome-electron list by Sindre Sorhus.
]]>HD Live Streaming Cats to YouTube with the Raspberry Pi Camera
How to stream in 1080p to YouTube Live Events, May 2015
Over the past few months I've built three versions of a camera to detect cats in my backyard, where I have placed a potted catnip plant. I don't have my own cat (allergies/landlord) so this is how I get my fix. Plus I recently got gigabit fiber at home and have this burning desire to use the bandwidth. The final version supports full HD live streaming (skip to bottom for that), but it took a few iterations to get there.
Version one
The first version was using some motion detection software called motion-mmal. It worked but the framerate was less than 1FPS, which isn't very good at all compared to the camera modules max resolution of 1920x1080 at 30FPS. I captured 3 cats helping themselves to my catnip, but the quality left me wanting more. I also found out there is a family of 3 opossum living in the large bush in my yard, and that there is a very, very fat raccoon that frequently visits.
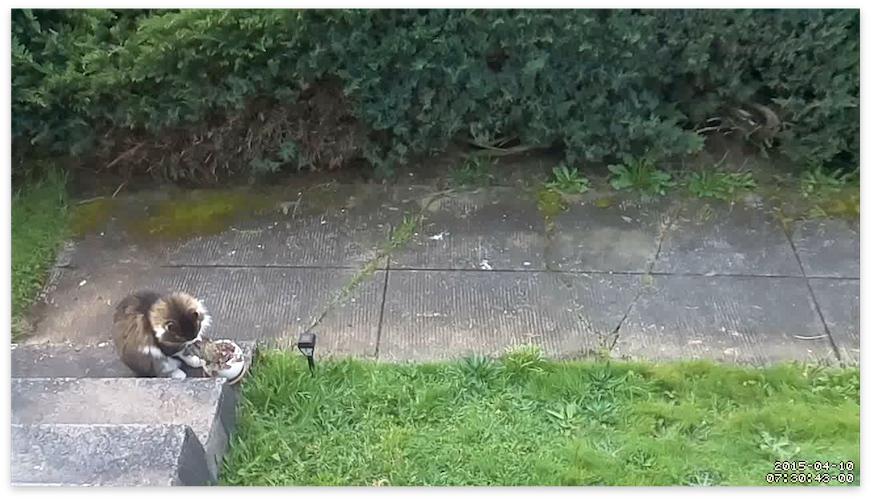
Here's an example of the framerate it captured (in lower resolution gif form). In this gif the offending cat (which I have never seen other than in this video) reaches such an emotional peak during its time with my catnip that it throws the nip off the first step, breaking the pot. If this act was intentional or not we will never know for sure. The catnip survived.
I believe the reason for the slowness of motion-mmal is that it isn't designed to run on such a low CPU power device as the Raspberry Pi. Maybe this issue will be fixed in the future, but as you can see from the framerate of the above gif, it has a long way to go.
Version two
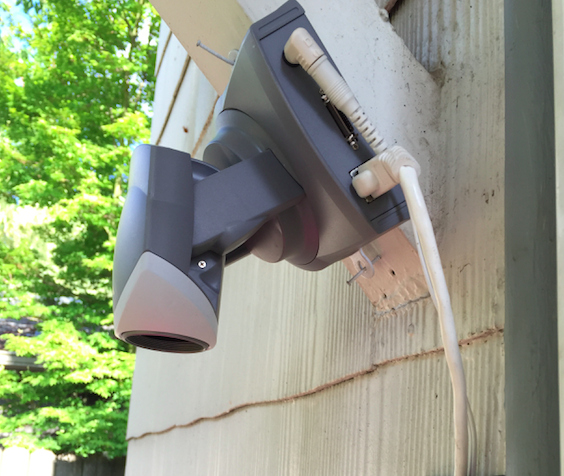
The next version happened thanks to a donation from my friend @beaugunderson, who donated a IP Network Cam to me for the cat surveillance cause. The camera, made by Axis Network, has an ethernet port and a web interface that had a video feed. I set up a wireless -> ethernet bridge using a WR702N and hooked the camera up in my back yard pointing down at my catnip plant.
It also boasted motion detection built in to the camera. Upon setting it up I found that it required Internet Explorer to configure the motion detection (thanks to an ActiveX-only UI), so I installed VirtualBox and configured it. It wasn't as easy to calibrate as motion-mmal, and I ended up getting a lot of shots of shadows on my porch.
Then came the problem of capturing video from it. It had a .mjpeg (Motion JPEG) live stream endpoint, but no storage and no way to record. I did discover a setting in the ActiveX UI that let me give it a HTTP endpoint to POST to when the motion detection was triggered. So I rigged it up to tell the server in my living room via HTTP POST when the motion detection triggered, and then that server would kick off a ffmpeg job that would archive the .mjpeg stream for 30 seconds.
This approach worked, but the quality wasn't acceptable:

Worse yet, the framerate was under 10FPS. Not gonna cut it in the age of HD! Another downside of the Axis Cam is that it required an AC outlet, whereas the Raspberry Pi has the nice quality of only needing USB power.
Version three (current version)
The main thing I learned in the first two versions is that I wanna try and avoid re-encoding video. It's slow (and especially too slow for CPU weak Raspi) and degrades quality.
For the latest iteration I went back to using the Raspberry Pi Camera Module. It's $25 bucks, so along with the $25 Raspberry Pi that brings the project cost to a nice even $50.
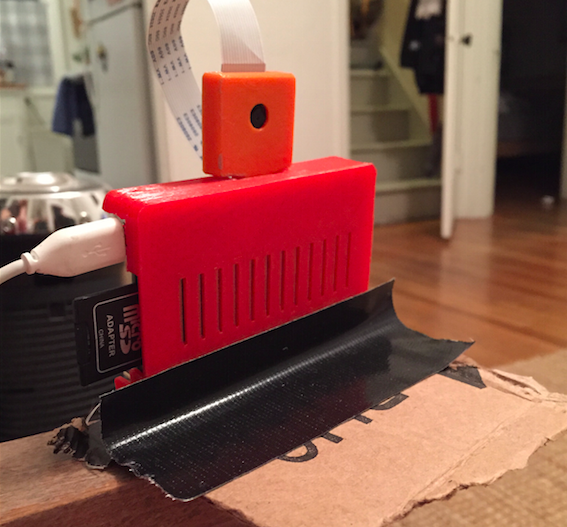
Raspberry Pi + Camera in 3D printed cases and a highly engineered stabilization mechanism
The raw data that comes from raspivid, a CLI tool that is part of the Raspberry Pi userland repository, is straight H264 encoded video data that comes from the on-board H264 encoder hardware chip built into the Raspi. This means it's fast and high quality. Re-encoding it in software is slow and crappy looking. Side note: it makes me deeply, deeply sad that our devices now come with chips that encode video data into a patented, closed video format.
I spent some time learning about the differences between encoding/decoding and muxing/demuxing. Muxing/demuxing is cheap (it just means wrapping the encoded video in a container format, e.g. .mp4 or .avi), but encoding/decoding is difficult and slow and involves lots of math and patents.
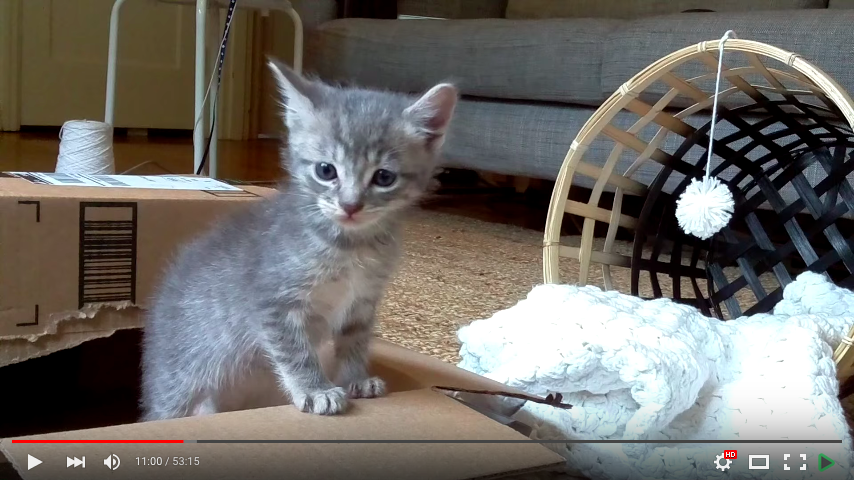
Then recently I agreed to take care of some kittens for a week. And since part my job was to find them adoptive parents (can't keep cats permanently), I figured a HD live stream would help find them a home. I looked the options, and the best one was YouTube "Live Events". UStream charges $99 bucks a month for HD streaming (seriously) and YouTube "Live Events", a feature baked into YouTube.com, offers 24 hour HD live streaming for free, with the last 4 hours of each stream available as a regular YouTube video afterwards.
Basically you create a new 'Live Event' on YouTube and it gives you a rtsp:// url you can stream audio/video to, and a public YouTube URL that anyone with a browser or YouTube app can watch live. And it's free, and supports HD. Pretty sweet!
Here's an example YouTube video of some kittens made using this method.
How to set up the Raspberry Pi
For this I used the Raspberry Pi B+. I don't have a Raspberry Pi 2 yet. I'm using the Raspbian OS. The trickiest part is getting ffmpeg. You can apt-get install libav-tools to get libav, the ffmpeg fork, but it didn't work for me and ffmpeg did. shrug. To get ffmpeg compiled for the correct ARM architecture that the Raspi B+ needs the easiest way I've found is to get it from this docker container:
docker run -t fiorix/ffmpeg-arm cat /opt/ffmpeg/bin/ffmpeg > ffmpeg
This will download the container if you don't have it already and save the ffmpeg binary as ./ffmpeg in whatever folder you run this as.
I have also forked the repo just to add the ffmpeg binary to GitHub so you can download it from here if you don't want to compile it (assuming you trust I didn't actually upload a virus).
You will also need the raspivid command. If you don't have it, try using a newer Raspbian, where it is included. Make sure you follow some Raspi camera tutorials to make sure the camera works.
To start the stream, run this command:
raspivid -o - -t 0 -vf -hf -fps 30 -b 6000000 | ffmpeg -re -ar 44100 -ac 2 -acodec pcm_s16le -f s16le -ac 2 -i /dev/zero -f h264 -i - -vcodec copy -acodec aac -ab 128k -g 50 -strict experimental -f flv rtmp://a.rtmp.youtube.com/live2/your-custom-session-here
Let's break it down:
-o -makes it write the video data to STDOUT so it gets piped intoffmpeg.-t 0is how you make it record forever-vf -hfflips it horizontal and vertical so it looks correct-fps 30sets frames per second to 30-b 6000000- output bitrate limit. YouTube recommends 400-600kbps, this is 600kbps. Change this to save upload bandwidth at the expense of a lower quality video-re- tells ffmpeg to slow down the reading of the input to the native frame rate of the input (useful when live streaming)-ar 44100 -ac 2 -acodec pcm_s16le -f s16le -ac 2 -i /dev/zeroand-acodec aac -ab 128kand-strict experimental- adds a fake audio channel filled with zeroes (silence). YouTube rejects streams without an audio channel. You can also change the input device to a microphone if you want (I haven't done this yet)-g 50adds a keyframe every 50 frames. Feel free to tweak, its one of those tradeoff variables.-f h264and-f flvtells ffmpeg it's receiving h264 input and that you should mux it intoflvoutput (flvis the container format that works with YouTube. Others might work but I haven't tried them)- by not specifying
-wand-hto raspivid we get the full 1920x1080 resolution (aka 1080p). You can specify these if you want a lower resolution
If your stream is working you should see something like this:

The bitrate in the bottom rate should match what you set on YouTube. Also important is the Stream 1 (copy). The copy means it isn't re-encoding the input video into the output -- it is copying it. This is what makes it fast and high quality.
Future plans
I'm gonna try these things out:
- Set up a 24 hour live YouTube channel of my catnip
- Run the motion detection out-of-band to try and capture specific events separately out of the live stream
- Try and get my friends who are smarter at video stuff than I am to write better cat detection algorithms
- Get other cat weirdos on the internet to set up their own catnip cams (looking at you, person who read the whole blog post)
- Try out a device using an Ambarella video capture chip. The Raspberry Pi Camera uses a OV5647 video capture chip and supports HD live streaming over the network thx to the Pi, but maybe the e.g. GoPro/Xiaomi Yi/SJCam (which are tiny ARM linux boxes too) can be hacked to do this with less overhead
If you found this post useful, or made something cool with the tips here, send me a tweet at @maxogden on twitter.
Happy streaming!
]]>Interdisciplinary Open Source Community Conferences
A bunch of events that are community organized and not specific to one language/framework silo.
I'm a huge fan of interdisciplinary learning. As someone who attends a lot of conferences related to open source or more general knowledge sharing, I have found that I enjoy events more if they span multiple topic areas. I've spent some time curating this list and can wholeheartedly recommend spending your dollars to attend these events.
If you have a suggestion for an event that should be on this list, leave a comment on this gist.
Criteria
- Must be an event that someone involved in open source would be interested in attending
- Must be a community oriented event (no corporate owned for-profit events are listed here)
- Can't be about a specific language/framework.
CodeNeuro
- SF, NYC
- http://codeneuro.org/
- "Bringing neuroscience and data science together"
Open Source Bridge
- Portland, OR
- http://opensourcebridge.org/
- "The Conference For Open Source Citizens"
Open Source Open Society
- Wellington, NZ
- http://www.opensourceopensociety.com/
- "OS//OS is a two-day gathering of bright minds and communities from open technology, open government, open business and open education"
Chaos Communication Congress
- Hamburg, Germany
- http://www.ccc.de/en/
- "The Chaos Computer Club e. V. (CCC) is Europe's Largest association of hackers."
CSV Conf
- Berlin, Germany (next one not scheduled yet)
- http://maxogden.github.io/csvconf.com/
- "A conference for data makers"
Data Terra Nemo
- Berlin, Germany
- http://dtn.is
- "Terra nemo is a Latin expression meaning "No man's land". In this context we describe systems and protocols without centralized ownership and how they impact the landscape of the internet."
SRC Con
- Minneapolis, MN
- http://srccon.org/
- "Two days of building better newsroom code, culture, and process—together."
OpenVisConf
- Boston, MA
- http://openvisconf.com
- "OpenVis Conf is a two-day, single track conference about the practice of visualizing data on the web. "
Polyglot Unconference
- Vancouver, CA
- http://www.polyglotconf.com/
- "Polyglot is a "non-denominational" software development un-conference event that encourages software developers and operators from different stacks, backgrounds and with different opinions to come together for one day of spontaneous sharing, teaching and learning."
Nonprofit Software Development Summit
- Oakland, CA
- https://aspirationtech.org/events/devsummit15
- "interactive festival of people who are passionate about co-developing technology to support the work of nonprofit and community organizations."
Mozilla Festival
- London, UK
- http://mozillafestival.org
- "MozFest is a yearly festival with hundreds of passionate people exploring the Web, learning together, and making things that can change the world. It's very hands-on and immersive. Sometimes it will feel chaotic, but everyone is open-minded and eager to help you make and learn with them."
foss4g
- All Over! Next is Seoul, Korea
- http://foss4g.org
- "FOSS4G is the acronym for Free and Open Source Software for Geospatial. It is the annual recurring global event hosted by OSGeo since it’s inception in 2006."
Open Knowledge Festival
- Berlin, Germany (next one TBA)
- http://okfestival.org
- "Organised by Open Knowledge and owned, in the broadest sense, by the open community, the Festival will bring together over 1,000 people from more than 60 countries to share their skills and experiences; encouraging them to work together to build the very tools and partnerships that will further the power of openness as a positive force for change."
HOPE - Hackers on Planet Earth
- New York City
- http://www.hope.net/
- "the most European of the American hacker conferences. defcon for cipher hippies. put on by 2600 magazine"
FOSDEM
- Brussels, Belgium
- https://fosdem.org
- "FOSDEM is a free event for software developers to meet, share ideas and collaborate."
FSCONS
- Gothenburg, Sweden
- https://fscons.org
- "FSCONS exists to provide a meeting place where subjects covering society, culture and technology can be discussed and brought to life in peer discussions, without being confined to each particular subject area. It should provide both the physical and virtual space where people, organisations and governments, with interest in the three subject areas can meet in a participatory and constructive dialogue. The unique combination of topics creates a platform where cross-pollination between the areas can occur, and where new co-operations and thoughts can emerge which allows the participants to find new inspiration even from areas outside of their own."
Libre Graphics Meeting
- location alternates between Europe and Northern America (next one Toronto, Canada)
- http://libregraphicsmeeting.org
- "The Libre Graphics Meeting (LGM) is an annual meeting on free and open source software for graphics. Held yearly since 2006 the Libre Graphics Meeting aims to attract developers, artists and professionals who use and improve free and open source software graphics applications. The LGM aims to bring these people together in the cause of creating high quality free graphics applications."
border:none
- Nuremberg, Germany (next one TBA)
- https://border-none.net
- "A novel 2-day concept conference about the decentralization of the web, featuring inspiring talks and creative sessions, spreading over several outstanding venues in medieval Nuremberg."
Decentralize Camp
- Dusseldorf, Germany (next one TBA)
- http://decentralizecamp.com
- "The web is more and more converting to a monoculture. Big global players like Google, Facebook and Co. control every part of our digital life and build an alternative web of walled gardens. It's in our hands to move the web in a new direction and keep it open and decentralized and it's our responsibility to get started now. This camp is about defining the status quo, about exchanging ideas, making plans and moving forward."
WutheringBytes
- Hebden Bridge, UK
- http://wutheringbytes.com/
- "A weekend festival of technology". "Was an amazing conference last year with talks from Sophie Wilson co-designed the ARM processor , Live rocket launching and a profound talk from Sarah Angliss on the origins of techno"
Squatconf
- In squats. Last one was in Paris.
- http://squatconf.eu/
- "Squatconfs are tech conference that happen... in squats, hence the name. It started because some of us are lucky enough to attend marvelous conventions, made with love by amazing people. Great events with top-notch speakers, incredible venues, and amazing parties. These conferences are run with huge contributions from volunteers, and financial support from sponsors, providing top-notch events at affordable prices. But even then, they're not affordable for everyone."
Notacon
- Cleveland, Ohio
- http://notacon.org
- "security, arts, culture. killer demoparty"
Theorizing The Web
- New York City
- http://theorizingtheweb.tumblr.com/
- "Theorizing the Web is an inter- and non-disciplinary annual conference that brings together scholars, journalists, artists, activists, and commentators to ask conceptual questions about the interrelationships between the web and society. We deeply value public engagement, and consider insights from academics, non-academics, and non-“tech theorists†alike to be equally valuable."
PolyConf
- http://polyconf.com/
- Poznań, Poland
- "a three-day, single track, multi-disciplinary conference on advanced technologies for programmers interested in polyglot approach to software development."
Indie Web Camp
- USA: Portland, SF, NYC, Cambridge
- Europe: Brighton UK, Berlin & Dusseldorf DE
- http://indiewebcamp.com
- The IndieWeb is a people-focused alternative to the "corporate web"
Open Help
- Cincinnati, OH, USA
- http://conf.openhelp.cc/
- Documentation and support in open source and open communities
Write The Docs
- North America, Europe
- http://conf.writethedocs.org
- "a series of conferences and local meetups focused on documentation systems, tech writing theory, and information delivery."
Setting up HTTPS with a wildcard certificate and Nginx
How I set up HTTPS with Nginx, April 2015
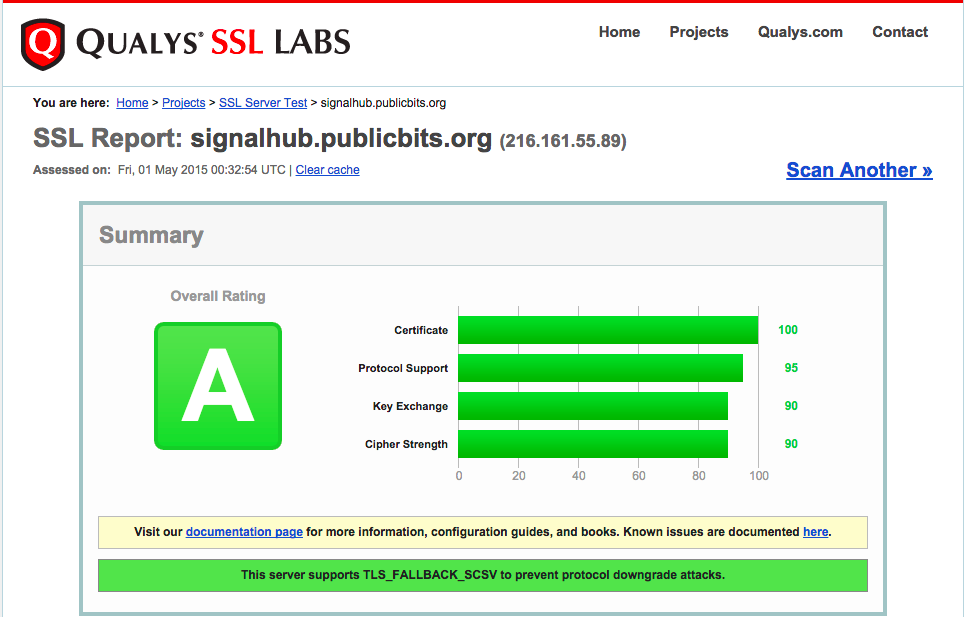
I finally got a wildcard certificate for my new domain publicbits.org. This means I can use one cert for e.g. https://foo.publicbits.org or https://bar.publicbits.org but also https://publicbits.org or https://www.publicbits.org.
At the recommendation of my friend Eric Mill I decided to try out SSLMate. Wildcard certs aren't cheap. From SSLMate it costs $149 USD. However, it was super easy compared to every other SSL purchasing experience I've ever dealt with.
It should take about 20 minutes to do all the things in this blog post.
I have high hopes for Let's Encrypt, which will essentially make this process cost $0 instead of $149, but until then this is the easiest way to do it that I've seen.
Note: my domain maxogden.com is hosted on GitHub Pages and they don't yet support HTTPS with custom domains. Email GitHub support and request this feature if it is important to you!
Installing SSLMate and buying the cert
First I signed up at SSLMate. I picked a username and password and entered my payment info.
Then they have you install their sslmate CLI utility.
sudo wget -P /etc/apt/sources.list.d https://sslmate.com/apt/ubuntu1404/sslmate.list
sudo wget -P /etc/apt/trusted.gpg.d https://sslmate.com/apt/ubuntu1404/sslmate.gpg
sudo apt-get update
sudo apt-get install sslmate
Then you can buy a wildcard cert from the CLI:
sslmate buy *.publicbits.org
Then they ask you some questions, verify the order, purchase the cert and then send you an email. The email has instructions for verifying your ownership of the domain on a Comodo site. Turns out SSLMate is basically a user friendly front end to Comodo's positiveSSL service. I really appreciate how easy they make the process, and hope more SSL providers will follow suit!
Then I did mkdir keys and cd keys. I was now in /home/max/keys.
Next was sslmate download --all. Now a bunch of files appeared in my keys folder.
The ones I'm using are *.publicbits.org.key and *.publicbits.org.chained.crt.
Installing and configuring Nginx
Then I installed the latest Nginx. I have a utility I wrote last year called install-nginx-on-ubuntu that I used. It basically does this:
sudo apt-get install -y software-properties-common
sudo add-apt-repository -y ppa:nginx/stable
sudo apt-get update
sudo apt-get install -y nginx
sudo initctl start nginx
Then after lots of twiddling around with configs I ended up creating this 'default' config and wrote it to /etc/nginx/conf.d/ssl.conf. It redirects all http:// traffic to https://.
# redirect http -> https
server {
  listen 80;
  server_name *.publicbits.org;
  return 301 https://$host$request_uri;
}

# default config (server_name _; makes this 'base' config)
server {
  listen 443 default ssl;
  server_name _;

  ssl_certificate_key /home/max/keys/*.publicbits.org.key;
  ssl_certificate /home/max/keys/*.publicbits.org.chained.crt;

  # These this next block of settings came directly from the SSLMate recommend nginx configuration
  # Recommended security settings from https://wiki.mozilla.org/Security/Server_Side_TLS
  ssl_protocols TLSv1 TLSv1.1 TLSv1.2;
  ssl_ciphers 'ECDHE-RSA-AES128-GCM-SHA256:ECDHE-ECDSA-AES128-GCM-SHA256:ECDHE-RSA-AES256-GCM-SHA384:ECDHE-ECDSA-AES256-GCM-SHA384:DHE-RSA-AES128-GCM-SHA256:DHE-DSS-AES128-GCM-SHA256:kEDH+AESGCM:ECDHE-RSA-AES128-SHA256:ECDHE-ECDSA-AES128-SHA256:ECDHE-RSA-AES128-SHA:ECDHE-ECDSA-AES128-SHA:ECDHE-RSA-AES256-SHA384:ECDHE-ECDSA-AES256-SHA384:ECDHE-RSA-AES256-SHA:ECDHE-ECDSA-AES256-SHA:DHE-RSA-AES128-SHA256:DHE-RSA-AES128-SHA:DHE-DSS-AES128-SHA256:DHE-RSA-AES256-SHA256:DHE-DSS-AES256-SHA:DHE-RSA-AES256-SHA:AES128-GCM-SHA256:AES256-GCM-SHA384:AES128-SHA256:AES256-SHA256:AES128-SHA:AES256-SHA:AES:CAMELLIA:DES-CBC3-SHA:!aNULL:!eNULL:!EXPORT:!DES:!RC4:!MD5:!PSK:!aECDH:!EDH-DSS-DES-CBC3-SHA:!EDH-RSA-DES-CBC3-SHA:!KRB5-DES-CBC3-SHA';
  ssl_prefer_server_ciphers on;
  ssl_session_timeout 5m;
  ssl_session_cache shared:SSL:5m;
  # Enable this if you want HSTS (recommended)
  add_header Strict-Transport-Security max-age=15768000;

  # from https://gist.github.com/konklone/6532544
  # Generated by OpenSSL with the following command:
  #   openssl dhparam -outform pem -out dhparam2048.pem 2048
  ssl_dhparam /home/max/keys/dhparam2048.pem;
}
Make sure you run openssl dhparam -outform pem -out dhparam2048.pem 2048 inside your keys folder (it will take a while).
Deploying processes
Then I use taco-nginx to deploy individual processes:
taco-nginx --name signalhub signalhub listen -m 10
taco-nginx takes care of generating a configuration for my app and then reloading nginx. For the above command the configuration file it generated is /etc/nginx/conf.d/signalhub.conf with the contents:
# generated by taco-nginx
upstream signalhub {
  server 127.0.0.1:54082;
}

server {
  listen 443;
  server_name signalhub.*;
  location / {
    proxy_pass http://signalhub;
    proxy_set_header X-Forwarded-For $remote_addr;
    proxy_buffering off;
    proxy_request_buffering off;
    proxy_http_version 1.1;
  }
}
With this configuration I can deploy new apps with taco-nginx quickly without having to configure them for HTTPS, since Nginx can reverse proxy HTTPS -> HTTP.
My score on SSLLabs is an A:
Thanks a ton to Eric Mill for helping tweak my HTTPS settings and Mathias Buus for helping with Nginx.
]]>A Month of Modules
Modules mafintosh and I wrote this month
I work on a distributed team with two other developers. The three of us are in three different cities. This month mafintosh came out and stayed in my guest room for the month. I wanted to take the time to document what we wrote during his trip to give a little insight into what is it like to work in an "open source first" way.
Most of these were written for use cases involving our day job, dat. Some, such as the Playback video player, were written for fun.
airpaste
Run airpaste on two computers that are on the same network and airpaste opens a two way binary pipe. Uses mdns (aka Bonjour) to connect peers.
axis-camera
A module to control a webcam in my backyard from node. The webcam points at some catnip in my yard and motion detects cats.
ble-stream
Implements a duplex stream interface on top of Bluetooth Low Energy
ble-swarm
Implements a swarm API (mesh networking) using ble-stream
blecat
Works like airpaste except uses bluetooth
electron-packager
Creates a mac .app from your Electron source code
electron-prebuilt
Lets you do npm install electron-prebuilt -g to get electron in your PATH.
electron-spawn
Run electron-spawn foo.js to run foo.js inside a headless Electron window
idlecast
Play videos on your chromecast when nothing else is playing. I use it to play the captured cat videos from the catnip cam.
mon-prebuilt
Lets you npm install mon-prebuilt -g to get the mon C process monitor in your PATH
multicast-dns-service-types
A low level module for parsing MDNS data. Factored out, like many of these, because Unix philosophy!
multileveldown
Lets us access a single LevelDB from multiple processes in a failsafe way
pbs
Protocol Buffer Streaming. A standard way to serialize protobuf data. We use protobufs for almost all data interchange now. We are getting friends to implement pbs in Golang and C++.
pick-random-stream
Tiny utility stream that lets you pick a random item from a stream.
playback
Desktop video player written in JS that supports torrent streaming, chromecast and youtube.
playback-chrome
Chrome extension to that adds a 'open in Playback' button to YouTube videos.
random-iterate
Tiny array module that can iterate an array in random order
require-times
Tells you how long require() calls take in your program
signalhub
A stateless pub/sub server with 'channels' that we use to introduce peers in p2p apps like Friends.
sorted-diff-stream
Used by dat to compute diffs between two branches, used when merging forked data
sorted-union-stream
Join two sorted streams based on a key
stream-iterate
A simple stream module to go through items in stream one at a time. We factored this out of our sorted-*-stream modules above.
subcommand
CLI routing tool that we use in dat to route subcommands like dat cat or dat add.
taco
We rewrote our deploy tools, and produced a series of small modules that can compose together into deploy pipelines. We're calling the system taco
taco-build
Runs a command inside a taco tarball (e.g. npm install --production)
taco-git-push-deploy
Lets you git push deploy with taco
taco-mon
Deploys apps using the mon C process monitor
taco-nginx
Auto configures Nginx to route traffic to your process
taco-pack
Creates a tarball from your app source code
tape-spawn
Testing module to make testing spawned processes easier
transport-stream
Abstract module to support different transports (used in dat), e.g. tcp://, ssh://, https://
utp-native
An experimental C implementation of the utp (micro-tp) protocol from Bittorrent.
webcat
Like airpaste or blecat but over webrtc. Uses github usernames for auth/discovery. Opens a duplex stream to someone over webrtc.
webrtc-swarm
A connection swarm API for webrtc. Manages a pool of webrtc connections. Used in Friends.
]]>Tessel Powered Plant Watering System
Make a water pump that can be turned on and off over HTTP using only JavaScript.
Warning Do not try this at home without the help of an electronics expert. Solid state relays switch high voltage and can cause bodily harm if used improperly.
I have been looking for a way to do hobby electronics projects using JavaScript running on microcontrollers. You can control an Arduino remotely from a laptop over USB with libraries like johnny-five, but you can't keep your code running after you close your laptop since the Arduino can't run JavaScript.
The Tessel is a microcontroller that runs Node code on the board. The team at Tessel wrote a JS to Lua compiler and then they run Lua directly on the Tessel hardware. It's not the fastest thing in the world, but it opens up most of npm to run on a wi-fi enabled, USB powered microcontroller the size of an Arduino.
For this project I used four components. It takes about an hour to put together:
- Tessel Microcontroller
- Fotek SSR-25DA Solid State Relay
- AquaTop NP-80 Submersible Pump
- Lutron TT-300NLH-WH Lamp Dimmer
I would also recommend using a junction box/electronics enclosure for housing the SSR along the lines of this one.
The key is the solid state relay. For background on how these works check out this excellent article, but the short version is that they let you use a small voltage (3.3V or 5V such as those available in "digital out" pins in microcontrollers) to turn on and off high voltage circuits such as 110V or 220V (wall outlets).
Instead of using an SSR directly as I did you could also purchase a PowerSwitch Tail, which is a pre-made, safely housed relay enclosure that comes to you already built.

To build the 'circuit', I simply cut the dimmer slider portion off of the Lamp Dimmer, stripped the ends off of the wires, and connected them to the SSR instead. Where there used to be a dimmer slider the circuit there is now the SSR.
The flow of electricity is roughly: Wall -> Dimmer -> SSR -> Pump. The tessel is connected to the SSR and can turn it on and off at will.
Again, I can't stress enough that you should really not try this on your own unless you have someone who is experienced with Solid State Relays and 110V/220V electricity.
Here's a video of the system in action:
The tessel is running a small HTTP server written in Node that turns the G3 GPIO pin on or off. When it is on it outputs 3.3V to the SSR, which tells the SSR to turn on voltage, which turns on the pump.
var tessel = require('tessel')
var http = require('http')

var pin = tessel.port['GPIO'].pin['G3']

var server = http.createServer(function (req, res) {
  console.log(req.url)
  if (req.url === '/on') return on(req, res)
  if (req.url === '/off') return off(req, res)
  return res.end('<a href="/on">/on</a> or <a href="/off">/off</a>\n')
})

server.listen(80, function(err) {
  if (err) console.log('error!' + err)
  console.log('http listening')
})

function on (req, res) {
  console.log('turning on')
  pin.write(1)
  res.end('turned on\n')
}

function off (req, res) {
  console.log('turning off')
  pin.write(0)
  res.end('turned off\n')
}
Save the above code as a file called server.js, plug your Tessel over USB, and run tessel push server.js to upload the server onto your Tessel. You can run tessel logs to view the HTTP server logs while your tessel is connected over USB.
Once you have the Tessel configured to join your home Wi-Fi (using the tessel wifi CLI command) it will then always automatically connect a few seconds after powering up, every time. You can put it anywhere in your house, power it over USB, and it will start up it's HTTP server and be accessible over your local network.
You could definitely use other microcontrollers instead of the Tessel for this. I like the Tessel, however, because it is the simplest way to run Node code on hardware, and they also make add-on hardware modules that are easy to use. For example, you could use the Raspberry Pi for this project, but it would be more complicated as you would have to configure Linux. I just prefer to keep things easy!
Happy hacking! Questions? Open an issue in this repository
]]>Gigabit Fiber in Portland
Review of 1Gb fiber from CenturyLink
Yesterday I got Gigabit fiber Internet installed at home in Portland, OR from CenturyLink. If you haven't checked out how fiber works here's a good intro video. The variety that CenturyLink offers is a passive optical network consisting of fiber optic cables strung up on telephone poles around town.

Here's the result of a speedtest I did today:

Gigabit fiber probably isn't practical for most Internet users today because it's more bandwidth than most Internet applications know what to do with. However, in a few years time, as more people get retina screens, 4K TVs, 8TB hard drives and neighbors with fiber Internet who stream super-HD video then there will hopefully be a tipping point. And the fiber infrastructure is relatively future-proof.
My day job is to work on data replication tools for really large scientific datasets so I jumped at the opportunity to get it at home.
CenturyLink vs Google Fiber
CenturyLink costs $109 a month (for the first year) and Google Fiber is $70 a month. Both offer 1000mbps up/1000mpbs down (133MB/s) with no download/upload limits or caps. CenturyLink's ToS states "Residential 1 Gbps plans are not subject to download limits" and this has been verified by the Seattle Mayor's office. Google Fiber's ToS also states they do "not employ volume-based data caps".
CenturyLink seems to be quite secretive when it comes to disclosing the price after the first 12 months. From looking at my first bill it seems their 'standard rate' for gigabit appears to be $153.95, and they give a $44.00 per month discount for the first 12 months of service. This information isn't advertised publicly on their website (from what I can tell).
The only major difference (beyond price) that I can find is that Google Fiber specifically prohibits commercial servers, but CenturyLink does not seem to.
CenturyLink's FTTH (Fiber To The Home) service seems to currently be in most of inner SE Portland (where I live).
Google Fiber isn't in Portland yet, and might never be. If I had the choice between Google Fiber and CenturyLink on my block, I would pick Google because of the price. That being said I am still incredibly excited to get gigabit internet direct to my home for less than some of my friends pay for their cell phone.
There's another local ISP doing Gigabit fiber in Portland called Fibersphere but they only offer it in selected apartment buildings and are still working on their broader rollout strategy.
Installation
You pay a (roughly) $100 setup fee and then another $100 for an Actiontec C2000A modem/router. They send a technician (or in my case two) out to your house for the 3-5 hour installation process.
First they allocate you a fiber optic cable up to 500ft in length. In my case it was 450. Here it is on the sidewalk outside:
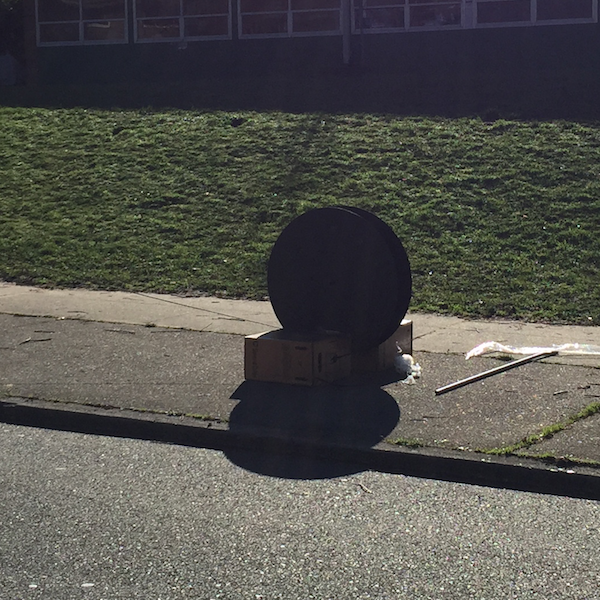
They have to run it along the aerial wiring along your street and connect it to the nearest fiber splitter, which are little black boxes attached to aerial wires.
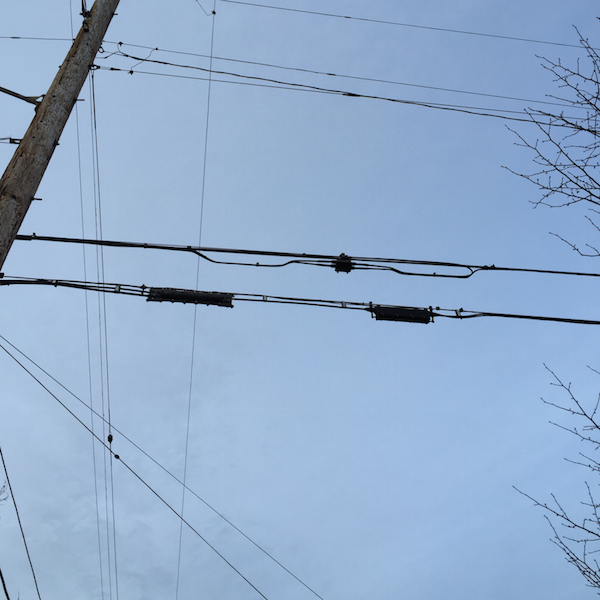
In my case the nearest one was at the end of my block. They actually said that starting from two more houses down the block from me they wouldn't be able to offer fiber service because it would exceed the 500ft limit.

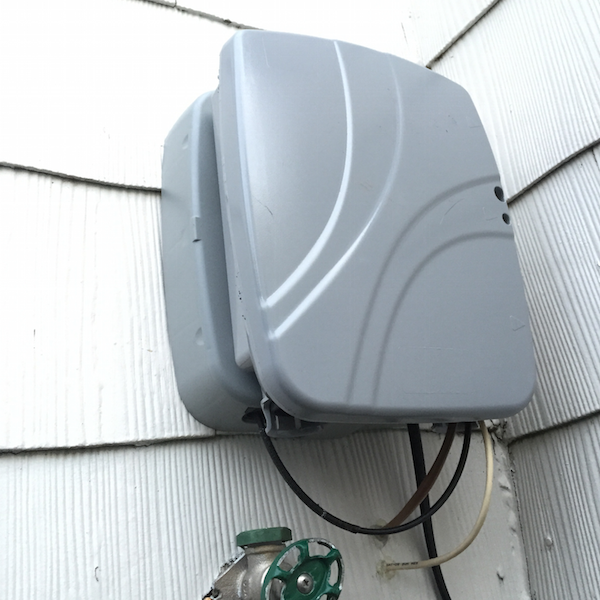
Then they put a optical terminator on the outside of your house. This thing converts data from the fiber optic cable into ethernet, which then enters your home and goes into the modem/router. Behind the terminator is the 'slack box' which holds the extra spooled fiber extension cable.
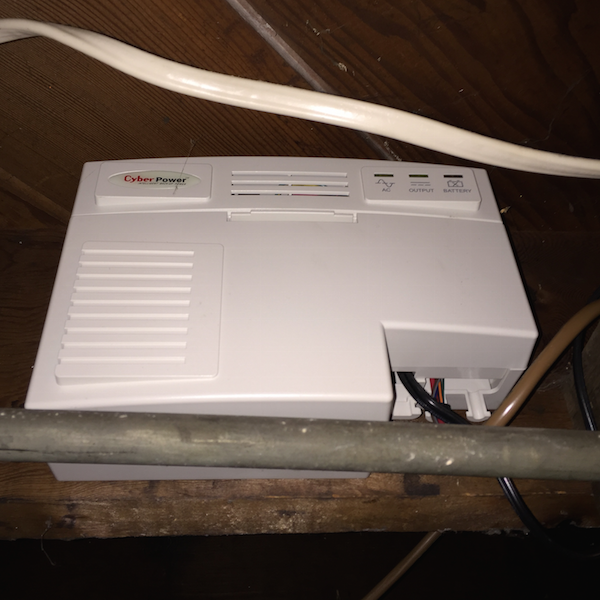
They also throw a power unit for the terminator in your basement.
Finally here is the modem/router combo unit they provided. It supports Gigabit Ethernet but only 802.11N wireless, meaning wireless bandwidth is limited to around 100Mbps.
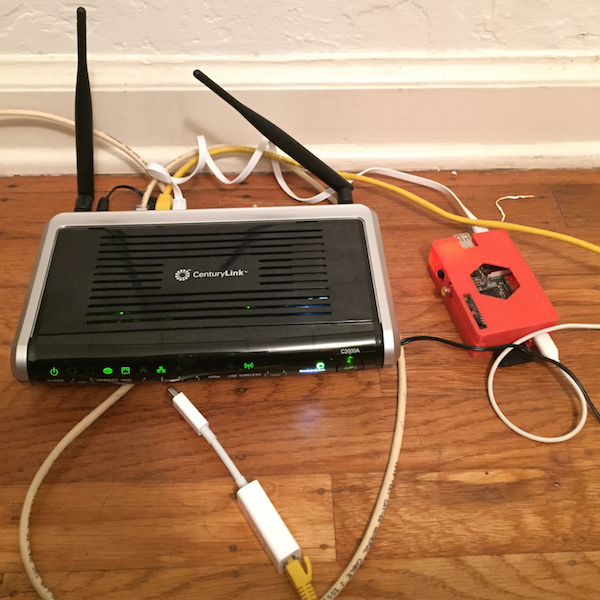
Attached to the yellow cat6 ethernet cable is an Apple Thunderbolt to Gigabit Ethernet adapter. The speed test from the top of this article was made while plugged in using this on a mid-2013 MacBook Air.
I also have a Raspberry Pi running a Tor Relay Node.
All in all it must cost CenturyLink quite a bit of money to upgrade a house to fiber, much more than the $100 in setup fees. Hopefully Google Fiber (and others!) enter the market to keep the competition going.
See you in the future!
]]>node-repl
An interactive console for node
You can install node-repl with npm.
Recently I was asked if there was an equivalent of the Interactive Ruby Shell (IRB) for node. IRB is great because it lets you quickly poke around in your program while it is running without having to set up breakpoints or print messages out to the console.
Node ships with a repl that you can run by simply typing node, and you can run a program by running node program.js, but you cannot both run a program and open a repl at the same time.
To solve this, with the help of my friends Mathias and Chris I whipped up a command-line module called node-repl.
Here's how to use it:
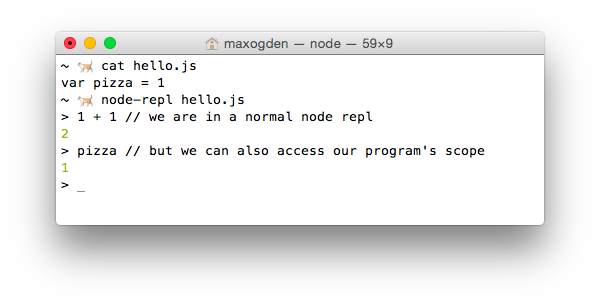
When you run a program with node-repl program.js, it both spawns your program but also opens a repl. The useful part is that the repl is executing code in the same JavaScript scope that your program is running in.
How it works
The functionality offered by node-repl seems simple at first, but underneath the hood it is doing a few tricky things: injecting the repl code, intercepting node's require and patching in eval from your program's scope into the repl.
Injecting the repl code
Node has a repl module in the core library that makes it easy to implement a fully featured repl. By default the repl executes code in it's own scope, but in order to get the desired IRB-style functionality (e.g. where pizza is available to the repl as in the above example) we want the repl to execute in the same scope as the program.
The repl code itself that node-repl injects is relatively simple:
;(function() {
  var repl = require('repl')
  var os = require('os')
  var empty = '(' + os.EOL + ')'
  repl.start({
    input: process.stdin,
    output: process.stdout,
    eval: function(cmd, context, filename, callback) {
      if (cmd === empty) return callback()
      var result = eval(cmd)
      callback(null, result)
    }
  })
})();
The whole thing is wrapped in an IIFE to avoid altering any external state in the users program, since this code is concatenated onto the end of the program. I very rarely use IIFEs any more because node's module system handles isolating files for you automatically (and if you use browserify you can use node's module system for client side code), but this case is an exception.
The code var empty = '(' + os.EOL + ')' is specific to how node's repl works. When you hit <return> in node's it takes whatever you typed and wrapps it in parentheses. For example, if you enter var x = 1 and hit return you will end up with (var x = 1\n) on OSX/Linux or (var x = 1\r\n) on Windows. The code require('os').EOL gets the correct line ending for the users current OS. Also (warning: this is just a parlour trick) try going into the default node repl and typing console.log)(42. Even though you didn't type valid JS code, it ends up working because it gets turned into (console.log)(42)\n by the repl.
A quick primer on scopes in node modules
When you run a program with node, e.g. node hello.js or require('hello.js'), node takes the contents of hello.js and wraps them in a function like this:
(function (exports, require, module, __filename, __dirname) {
  var pizza = 1
});
Wrapping your code in a a function like this causes a new scope to be created for your code to run in. You could have two different modules that both set var pizza to different values, and because of the way that JavaScript's function scope works they can both exist in their own scopes without conflicting. This property of JavaScript is what allows node's nested dependency system to work and is extremely simple and powerful.
The problem with this for us is that your code is running in it's own scope, and node-repl needs access to it! This is why we "inject" (in this case by concatenating) our repl code into your code before it gets required.
Intercepting node's require call
Node has a somewhat obscure API called require.extensions that lets you change what happens when files of a certain file extension are required. For node-repl we use this to rewrite the users program before it gets executed.
The following code is from https://github.com/maxogden/node-repl/blob/master/bin.js
var original = require.extensions['.js']
require.extensions['.js'] = function(module, filename) {
  if (filename !== file) return original(module, filename)
  var content = fs.readFileSync(filename).toString()
  module._compile(stripBOM(content + replCode), filename)
}

require(file)
First we store the original .js require function, so that we can call it for files other than our program. Then we define our own custom require.extension that emulates what the default .js require code does, but does content + replCode first, which 'injects' our repl into the users program code. We reverse engineered the default .js functionality by looking at the output of console.log(require.extensions['.js']).
Finally, we require(file) which triggers the extension we just defined with the users program. This was confusing to me at first because the users program may not have module.exports in it, and it seemed unintuitive to me to require something when I really just wanted to execute it, but this is in fact a valid way to simply run code. module.exports defaults to an empty object ({}), meaning you can simply use require to run a JS program in it's own scope.
Patching in eval
The node repl supports passing in a custom eval function, which is how we are able to swap out it's default eval with the eval from the program scope.
After being wrapped by require and having our repl injected the code looks like this:
(function (exports, require, module, __filename, __dirname) {
  var pizza = 1
  ;(function() {
    var repl = require('repl')
    var os = require('os')
    var empty = '(' + os.EOL + ')'
    repl.start({
      input: process.stdin,
      output: process.stdout,
      eval: function(cmd, context, filename, callback) {
        if (cmd === empty) return callback()
        var result = eval(cmd)
        callback(null, result)
      }
    })
  })();
});
The trick here is that eval above is the eval from the same scope as what the program is running in, which gives it access to local variables like pizza.
Happy hacking!
]]>Nested Dependencies
Insight into why node_modules works the way it does
There are a lot of package managers in use today, but the only popular one (to my knowledge) that is designed to support + works by default with nested dependencies is npm.
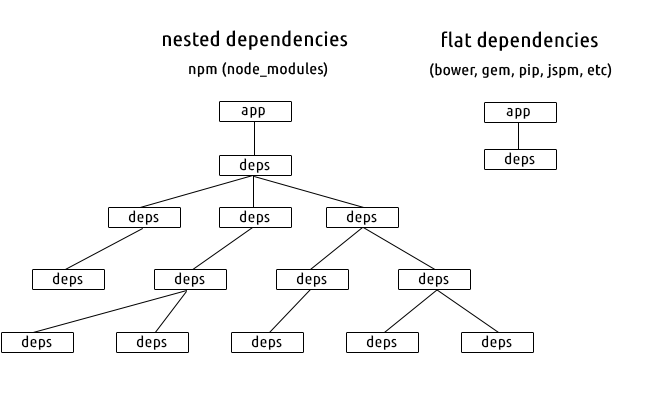
In the above diagram the deps containers represent isolated sets of dependencies. In most package managers there is only a single 'namespace' for all dependencies. I refer to this behavior as 'flat' because it means you only have one level of discoverability when resolving a dependency, which means you can only have one dependency called 'foo' in your entire app.
Let's look at a close-up example of how dependency resolution works in a flat dependency system.
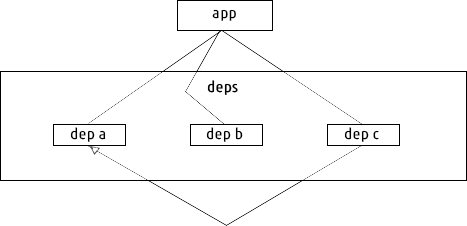
In this example we have three dependencies. The black lines represent 'depends-on' relationships, so our app depends on a, b and c, and c depends on a. So both our app and c depend on a.
Because the dependencies are flat, meaning we can only have one copy of a in our entire app, it means we have to make sure that both our app and c both depend on compatible versions of a. If we want to upgrade c to a newer version, but that new version also upgrades a to a version that in incompatible with the a that our app depends on, we have a dependency conflict. This phenomenon is referred to as "DLL Hell" (from Windows) or more generally "Dependency Hell".
Let's look at the same example but in a nested system.
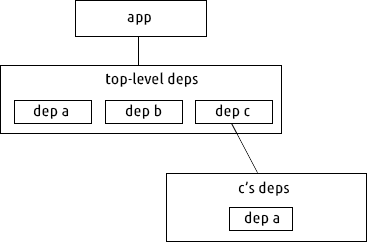
Here we don't just have one level of dependencies, we have multiple. Assume a and b have no dependencies. Our app and c both still depend on a.
With nested dependencies we now have two copies of a. If our app needs a at version 1 and c needs a at version 2 then there is we just install both versions of a. The dependencies of c are only available to c, nothing else can access them. Additionally, if it turns out that our app and c both depend on a compatible version of a, we never need to create the c's deps folder -- so the behavior in that case would mimic flat deps (this is how npm dedupe works).
Pros and Cons
Flat
- The simpler of the two designs. It's up to you to decide how much complexity you want to deal with.
- Dependency conflicts (AKA dependency hell)
- Sometimes the only option for languages where you cannot load dependencies in isolation
Nested
- No dependency conflicts
- Encourages use of small, isolated modules
- More complicated
- Good for languages like JavaScript with first class scoping support for isolating dependencies from each other
- Installs multiple copies of dependencies (when necessary), so takes up more disk space (though in practice this is rarely an issue because code is small).
- Confuses users who use dependencies that aren't designed to be modular (e.g. 'Why do I have five versions of jQuery in my browserify app?')
Introducing RequireBin, Browserify-CDN and npmsearch
Max Ogden
Three new projects that bring npm modules to the web
npm: Node Packaged Modules
A common misconception about npm is that since it has 'Node' in the name that it must only be used for server side JS modules. This is completely untrue! npm actually stands for Node Packaged Modules, e.g. modules that Node packages together for you. The modules themselves can be whatever you want -- they are just a folder of files wrapped up in a .tar.gz, and a file called package.json that declares the module version and a list of all modules that are dependencies of the module (as well as their version numbers so the working versions get installed automatically). It's turtles all the way down - module dependencies are just modules, and those modules can have dependencies etc. etc. etc.

The main features that npm brings to the table (in my opinion) are:
- Automatic installation + upgrading (e.g. no more downloading individual .js files and moving them manually into your js/ folder)
- Modules specify a list of other modules that are dependencies
- Dependencies get installed at known working versions
- Each module gets it's own local set of working dependencies (different versions of the same module can be depended on by different modules in the same project)
- Dependencies can have dependencies
- The availability of solutions on npm makes you feel like a kid in a candy store
I've written more about the specifics of writing programs with npm in my Art of Node article. If you haven't grokked how npm works yet I highly encourage you to give it a spin. Some other great reads on the subject: Using npm on the client side and Browserify and the Universal Module Definition by @shamakry and Introduction to Browserify by Seth Vincent.
Browserify: Using npm for client-side programs
A traditional JS app that might have a few libraries like jquery.js, bootstrap.js, angular.js, underscore.js and a few additional plugins. Since there are only a handful of js files it's not a big deal to manually download, move and add a script tag for each one.
Node programs, on the other hand, don't have the same limitations as browsers. Any program can require() another program and start using it. Programs can be published as tiny components that do one thing well, a la Unix. There isn't a strict definition but generally speaking code is modular if it exposes a generically useful API that be used by multiple dependent modules.
There is only one problem: browsers don't have a good way to load modules. The state of the art is to have a ton of script tags that either leak globals e.g. how jQuery plugins all use $ or use RequireJS to manage loading code into the correct scopes.
Both of these approaches make tons of HTTP requests which means when your app gets bigger than a dozen or so dependencies then you'll want to start thinking about a build step to reduce page load time.
A good module system enables better code to be written. When you have to worry about limiting the number of script tags you will tend to use large kitchen sink style projects like jQuery. A build step is just some process that combines multiple JS programs into one larger JS program so that you can reduce the number of script tags on your page (and sometimes also other things like minifying code).
Browserify is a build tool that builds bundles of modules from npm. Here is a visualization (using the colony node module) of what the bundle looks like when browserify packages up the voxel-engine module:
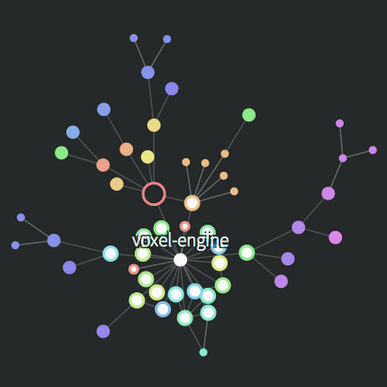
Each dot is a fully fledged node module, complete with its own version number, github repo, author/maintainer and optional list of dependent modules. Each author gets their own color and the circle sizes are based on how large the modules are.
Thanks to npm and browserify the Voxel.js project has seen a couple dozen unique contributors create around 100 modules over the last six months. The conventions are pretty simple: Use npm and name your module voxel-"something" so that it's easy to find. Most of them don't even run in node itself as they require WebGL to function, but that's okay because node is simply packaging them up for browsers.
When browserify bundles up the voxel-engine module it gathers up all of the dependencies in the graph and combines them into a single JS program that you can load into a web browser and run.
Browserify CDN
Browserify is written with Node and is usually executed on the command line on the same computer that a program is being developed on. To make browserify more accessible to JavaScripters that aren't as comfortable with the command line or Node browserify-cdn was developed by Joshua Holbrook, a Node hacker who has formerly worked on the Node hosting platform Nodejitsu. It's a really well designed caching + API layer built on top of browserify that automatically installs and packages up any module available on npm.
This week I set up a production ready instance of browserify-cdn over at http://wzrd.in (wizardin', like the browserify logo). It's also pretty easy to host an instance yourself. The browserify-cdn API is CORS enabled which means you can load bundles from anywhere on the internet (and do things like cache them in IndexedDB).

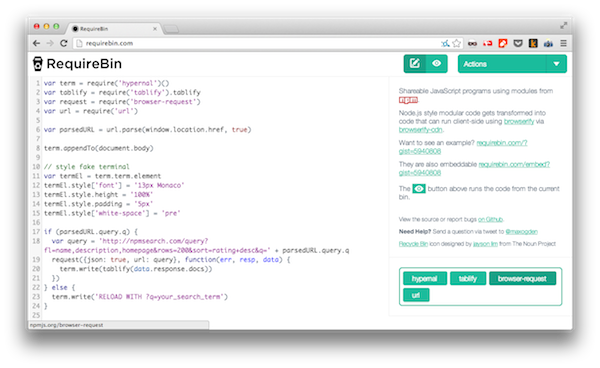
RequireBin
In the spirit of JSFiddle and JSBin, RequireBin is a web application that I wrote over this last weekend for making short + sweet shareable JS applications that run in the browser. The major difference from similar works being that RequireBin is built on top of browserify-cdn and therefore provides access to the wealth of modules on npm. RequireBins are saved as github gists so that each one is clone-able and fork-able and the RequireBin website itself is just a static site that is hosted on Github Pages.
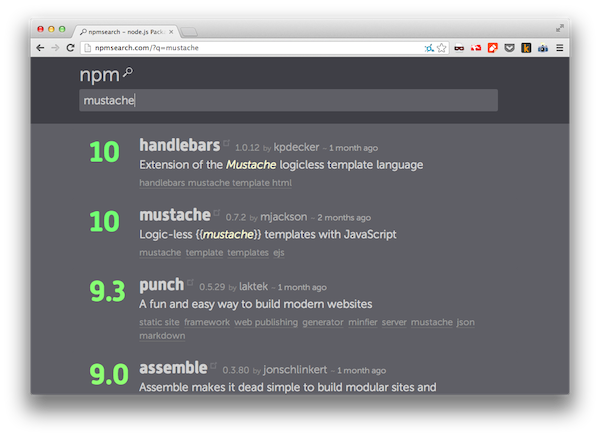
npmsearch
The npm command line tool has a built in search feature but it is quite barebones and doesn't have a dedicated full text index. To provide a better search experience to npm users Elijah Insua (tmpvar) has created npmsearch.com which offers lightning fast search (Solr + SSDs) and a CORS enabled JSON API for adding npm search to any app.
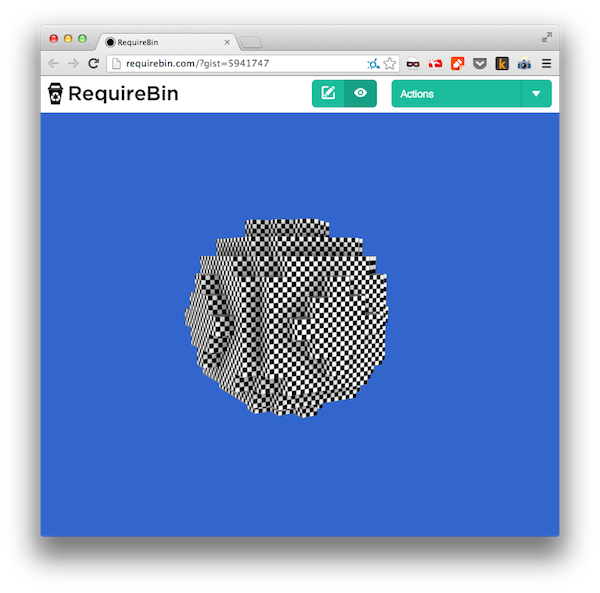
Here's a live embedded iframe of this RequireBin integrating with the npmsearch API and rendering output to a fake ANSI terminal via hypernal and tablify, two modules I recently found on npm.
For a more complex RequireBin example check out this WebGL Ambient Occlusion Voxel rendering demo by computational geometry PHD student Mikola Lysenko:
Mikola also happens to be the most prolific author of node modules lately (according to npmjs.org), you should definitely look at his modules and read his blog.
I'll end this post with this, the first and arguably most important rule from The Art of Unix Programming, a text close to the hearts of many of the Node community members.
Kindleberry Wireless: A Portable Outdoor Hackstation
Max Ogden
An updated, wireless version of the kindleberry using the kindle paperwhite
Recently I got to go down to Australia to attend an awesome conference called CampJS. It isn't really a conference, actually, but instead a bunch of programmers in the woods for a few days hacking on side projects and learning new things. Getting out of the big city was really refreshing and at the same time made me realize how badly my glossy screened laptop works in the great outdoors.
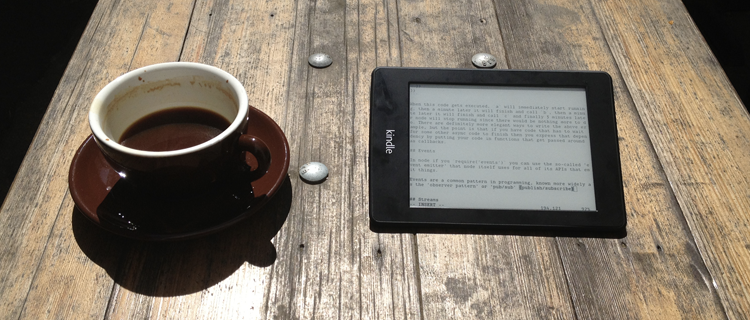
It got me wondering if there existed a laptop that was designed for hacking in direct sunlight... something that had a ridiculously long battery life and was still readable in high brightness situations. Instead I stumbled upon a more awesome solution: the kindleberry, a combination of the Raspberry Pi and the Amazon Kindle.
The advantages of the kindleberry are pretty desirable for me:
- Week-long battery life: the pi and the kindle both have low power ARM processors so you can use any USB charger to power them
- The kindle screen is designed for use in direct sunlight
- The whole setup is small enough to carry around in a pouch inside my normal backpack along with my normal laptop. I work from coffee shops in Oakland and often move around by bicycle during the day -- now I can work from almost anywhere and still be at least a little productive.
The idea of the kindleberry is to have the kindle just act as screen and have it log into an ssh session on the pi. Then you can plug a keyboard into the pi and it when you type it will show up on the kindle screen. This approach pretty much only works for terminals so you can't do anything except edit code in vim. I like this limitation as it gives me an option that is free from distraction for writing long pieces of code or text.
Since the screen on the kindle is e-ink it has a slower-than-normal refresh rate. If you are a touch typist this shouldn't be an issue, I would recon that between the wifi latency and the screen latency there is a ~200ms screen delay, but it doesn't bother me at all when typing.
The first problem I ran into was that the kindleberry instructions only worked on Kindle 3 devices, and the newest generation of Kindles (e.g. the paperwhite) are Kindle 5's. While the end result is similar this just means that essentially all of the steps to set up and install the peripherals correctly were different, including the terminal software that runs on the kindle. The other issue was that I wanted a totally wireless version: no cords between the keyboard, kindle or pi.
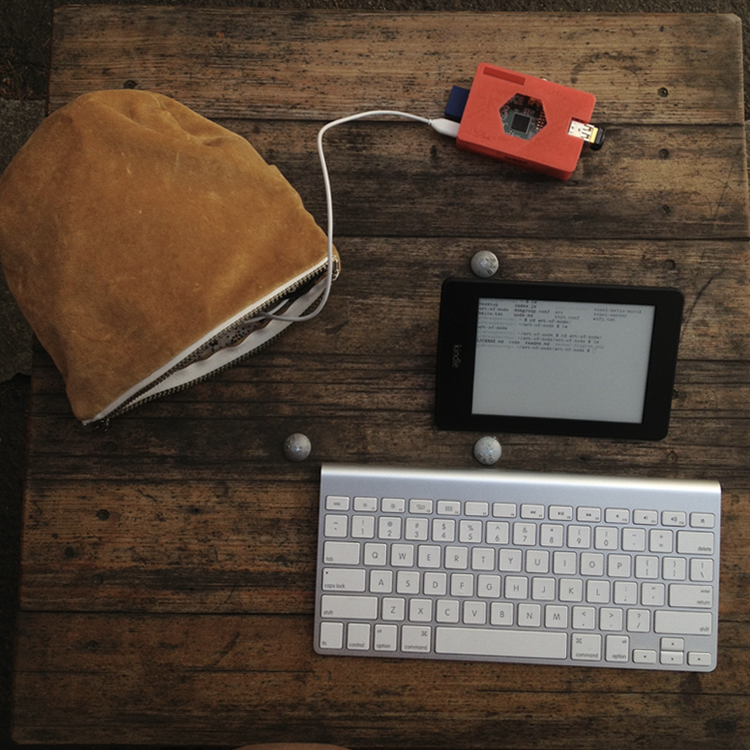
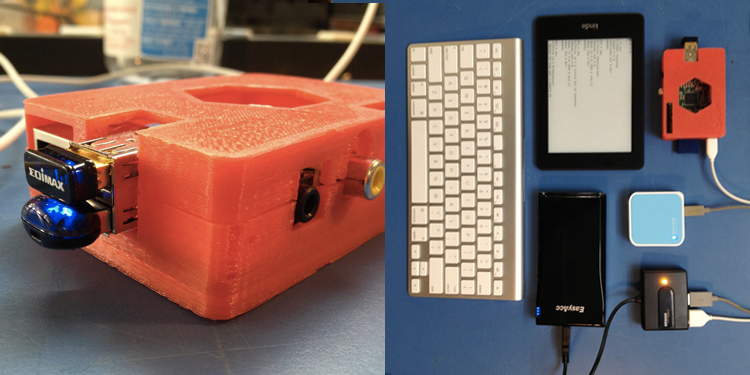
Here is a list of physical parts that I am using in my setup:
- Raspberry Pi Model B with a 3D printed fork of this case
- 8gb SD card to put the raspbian OS onto
- Kindle Paperwhite cause it has the fastest e-ink refresh rate of all the kindles + a nice backlight
- Apple Wireless Keyboard because I use a mac laptop and the layout is the same
- IOGEAR GBU421 bluetooth USB because it is small and works on raspbian
- Edimax EW-7811Un wifi USB because it is small and works on raspbian
- EasyAcc USB LiPo battery pack a friend recommended this and said he ran a raspi off of it for a week
- TP-LINK TL-WR702N Travel Router for establishing wireless connectivity between the kindle and the pi
- 4 port USB hub just because it is useful to have around for cable management
For the software side of things, the best resource is this nice tutorial that Rod Vagg has put together for getting the paperwhite set up with a terminal emulator. He even compiled node.js 0.10.0 for the kindle as well!
My pi is configured to boot up and join the wifi hotspot that the TP-LINK router creates, then I can have the kindle communicate to the pi over wifi. There is probably a way to ad-hoc them together automatically but having a little hotspot is handy for other things like too like mobile web app development.
]]>Bringing Minecraft-style games to the Open Web
Max Ogden
A status report from the one month old voxel.js project
Shortly after Christmas 2012 (about 3 and a half weeks ago) the Story of Mojang was intentionally released as a torrent. I watched it and was inspired. A year earlier I had purchased 2 copies of Minecraft for my nephews to play (and they haven't done much else since) but as gaming hasn't been a big part of my life for the last few years (because I've been too busy programming) I never had much time to play the game. Seeing how engaging Minecraft could be for my nephews was fascinating so I started looking into the modding community to see how feasible it would be to do things like hook Minecraft up to OpenStreetMap. My first foray into programming logic was in Starcraft over a decade ago so I figured that a game that is so addicting and yet so simple could be a really powerful platform for education.
I was disappointed to find out that not only is Minecraft closed-source but it also hasn't shipped an official API (these are used to extend a programs functionality). Instead, if you want to change the way Minecraft works, you have to decompile the Java program that Mojang distributes and then reverse engineer it to make it do what you want. Despite these technical hurdles, due to the success of Minecraft there is still a huge modding community. One of my favorites is World Edit, which lets you bulk edit the Minecraft world by doing things like making giant pyramids, spheres, rectangles or even frosted donuts.
The first thing I tried to do was install a plugin. I immediately found myself on old forum posts that I found on google while looking for answers to obscure questions like what the OS X path is for the plugin folder, how to downgrade my Minecraft version because I had upgraded to the newest version which broke the plugin I was trying to use and how to edit a Minecraft world file that I had downloaded from someone else to change the game mode from Survival to Creative (turns out you have to use a hex editor).
For the last couple years I have grown accustomed to the automated installation of modules that NPM provides and wondered if anyone had tried to make a package manager for Minecraft plugins. There are a few out there, but quite frankly they all reeked of Java (too many abstract interfaces, lots of boilerplate and hard to use build tools. Java was the first language I learned so I may very well be scarred from the experience) and were limited by the nature of decompiling as a workaround to Minecrafts lack of an API.
Had anyone written a voxel engine in JS?
At this point I had decided that decompiling Java wasn't in my future, so as any JavaScript programmer would do I decided to rewrite the entire thing in JavaScript. The fun part is that at the time (3.5 weeks ago) I had zero experience programming games. But I had google search and free time.
On Github I found 26 repositories that contained some approach to rendering voxels in a browser. I spent a few days getting them to run on my computer and reading the source code of every single one. The projects that stood out were webgl-meincraft, voxelworlds and WebGLCraft. Daniel Ribeiro wrote a post one year ago called Implementing Minecraft in WebGL and Jonas Wagner did a talk at OnGameStart a few months ago called Rendering Voxel Worlds using WebGL and produced this impressive demo. I later found BLK Game by Ben Vanik from Google which also has an impressive demo. My problem with every single one of the 26 projects that I found is that they were all huge projects that were hard to wrap your head around and hack on. I was trying to escape the Java mentality and make game development small and modular (like NPM) but didn't find a single project that had well documented, modular components. Some were written in coffeescript, hadn't been updated in over a year, had giant lib/ folders filled with custom written modules or only produced a single tech demo and then were never used again. To summarize: it was possible but still not very accessible.
I also discovered an obscure subreddit called voxelgamedev that had produced a wiki page called The BIG list of block engines and resources!. Through this I found out about Mikola Lysenko's blog 0fps.wordpress.com and his articles Meshing in a Minecraft Game, Meshing in a Minecraft Game (Part 2) and An Analysis of Minecraft-like Engines. Not only were these written in an amazingly accessible way but they also had a voxel meshing sandbox implemented in WebGL and three.js.
Start with a few small modules
Mikola had some code hidden away in his blog that I used a the basis for two modules: voxel and voxel-mesh. With these two modules I could create a little wireframe world.
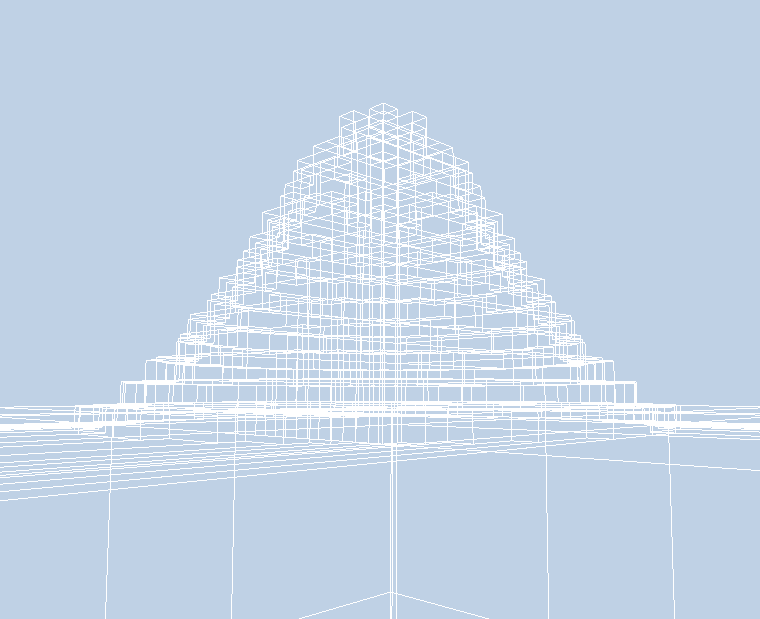
You should read Mikola's posts but the main idea with a voxel rendering engine is to create chunks of voxels. If you try to treat each individual voxel as an individual cube then you will have to send too much state back and forth to the GPU and your game will be slow. If you use one giant mesh for all the voxels in your world then it will take to long when a player digs a hole in the ground because you will have to recalculate the entire world. Chunks should be sized "just-right" in the middle of these two extremes so that you aren't making thousands of draw calls per frame but also can make voxel editing imperceptibly fast.

When you edit a voxel (to make a cave or build a tower) you are actually telling the engine to recalculate an entire chunk with or without a voxel present. To reduce the number of vertices these get culled/decimated (jargon for simplified) so that you aren't drawing voxel edges that the player can't see. To implement voxel editing I shoot an invisible ray (using the Raycaster in three.js), see where it intersected with the world, look up if the voxel there is air, dirt, brick or some other material, toggle it, and then tell the parent chunk to re-render (which includes the simplification). All of this happens quickly enough that the editing feels fast while you are playing the game.
The next thing to tackle was to get first person shooter style controls and physics hooked up. Luckily Chrome 23 was recently released and included support for the HTML5 Pointer Lock API. I based my physics on the code behind this demo by mrdoob but heavily modified it (made it more modular) and turned into the player-physics module. It still isn't perfect and I would love to see other approaches to FPS controls in JS now that Pointer Lock is here.
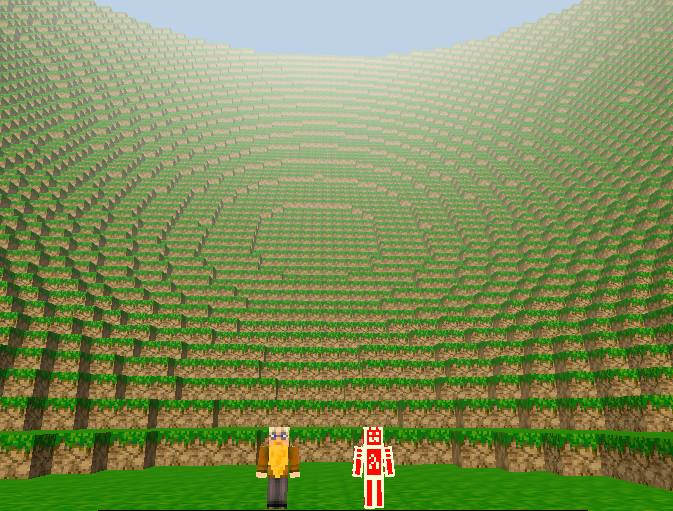
The project was a week old when I got stuck on collision detection and voxel texturing. I called for reinforcements and fellow Oakland JS hacker Substack answered the call. We stayed up until 2AM a couple of nights in a row and had a thing that kind of looked like Minecraft. Substack had some experience doing 3D programming and figured out how to calculate UV mappings and normals to texture our meshes. He also wrote some basic collision code so that the player could jump on top of and run into voxels. If you got stuck inside a voxel (which happened a lot) you would slowly float up to the top and pop out on the surface again. Good enough for a first version! One thing we couldn't figure out is how to have separate bottom, top and side textures for voxels so our world looked a little bland (but not too bad).

During all of this early-on hacking Substack said something along the lines of "I can't wait until all of this 3D rendering stuff is done so we can never think about it again". What he meant was doing things like UV mapping, player physics and occlusion culling are things that some game developer should write once in a generic way and then be used by other higher level developers to hack together awesome experimental voxel games. I personally appreciate 3D programming and think game developers are super smart, but JavaScripts place in the world is to amateurize. This stuff should be easy and approachable for new programmers. Once we establish a nice platform of abstraction then we can enable any JS programmer to make their own Minecraft clone from scratch in just a few lines of JS.
Voxel.js
I decided to name the project voxel.js and figured that we should have a website. My wonderful girlfriend Jessica Lord offered to help design a basic website because she also wanted in on the exciting voxel action. We threw together voxeljs.com over the course of a couple days and substack and I made a bunch of inaugural modules to get the point across.
The core module is called voxel-engine. This module is used to create a game instance which can be given to other modules so that they can augment the game. The engine is responsible for doing things like rendering the world using a game loop. The goal of the engine is to be simple with sensible defaults that are easy to override.
To use Pointer Lock we got some help from Chris Dickinson who ended up writing the interact module for us (though it would be useful in many programs). I made a module for HTML selectable toolbars (used for selecting block types) called toolbar and another for generating terrain called perlin-terrain. Substack then wrote creature, debris and forest which really proved to me that we were on to something.
Before we "announced" the project publicly (I use quotes because all the code had been in public Github repos the whole time) I thought I should try to make a multiplayer server and a couple hundred lines of JS later had a basic implementation where every player was an animated 3D horse :D.

Pictured here is @izs (Node.js maintainer) running across a bridge he made in an early multiplayer test.
I later learned about techniques to make real time multiplayer games fast like the Source Multiplayer Networking article and the Build New Games HTML5 Networking article. The server is still a work in progress but has server-side physics and (somewhat currently broken) client-side prediction. If this project interests you then get in touch and I can help you start hacking on it!
Contributions!
The goal in most of my open source projects is to solve stupid problems so other people don't have to. Then people will use your solution to build other new things. It is a great feeling to see someone make something because of work that you did to make that thing easy.
In this way voxel.js has totally exceeded all of my expectations, even though I am writing this only a week and a half after the initial public release. Since the project started we have generated about 25 modules, half of which are from me and substack but half of which have come from outside contributors.
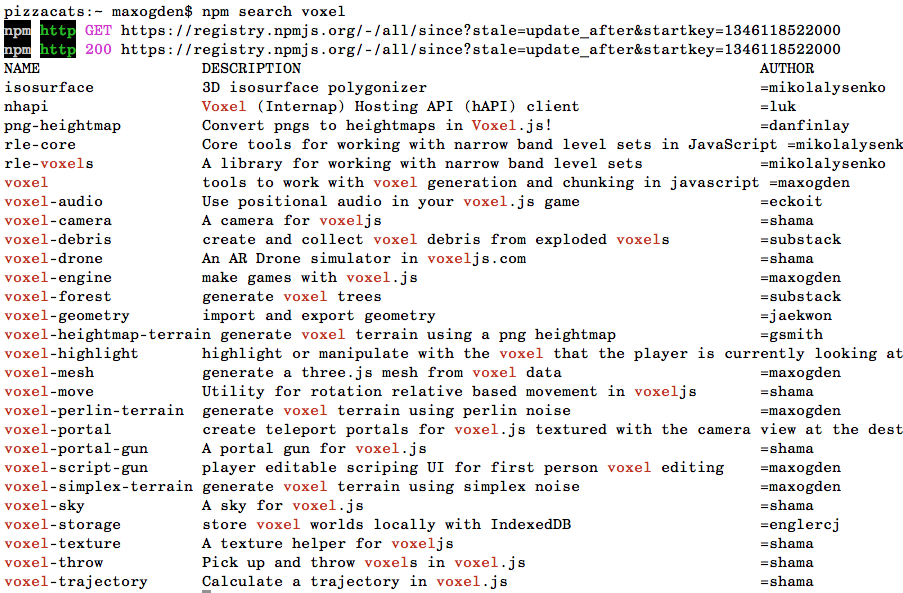
The first mind blowing module that I saw was made by Kyle Robinson Young (@shama). It is called voxel-drone and is a full emulator for the nodecopter. At Node.js + JavaScript conferences around the world over the last few months (largely in part to some awesome work by @felixge) there have been offshoot events called NodeCopter in which participants with (usually) zero hardware experience spend a day writing JS to control quadcopter robots. Kyle had been to a nodecopter event in San Francisco and also other node events around the bay like TacoConf. What he did with voxel-drone is allow you to use the exact same JS library that you would use to control an actual drone but all in your browser on top of a voxel landscape. On top of that he implemented a virtual iPad of sorts in the game so that you can see what the drone sees. Go and play with the demo now, seriously. There is a list of commands in the readme for the node-ar-drone project.
Many members of the Node.js community also are disciplined in writing small, Unixy pieces of software that do one thing and do them well. This is where the modular design of voxel.js comes from but also where our contributors come from. Since we used the package manager from node, put all of our code on Github, made some exciting demos and encouraged others to build new modules we were able to tap into the creativity of other members in our community like Kyle.
While I was writing this article Kyle actually released a new module called voxel-sky which lets you add sun and moon cycles to your voxel world.
At a Music Hack Day hackathon somewhere in northern Europe last weekend a developer named Andrey Popp made a project called MusVox that adds Soundcloud powered voxels. It even won a prize!
Also in the realm of audio Ryan Ramage from the CouchDB community wrote the very impressively executed voxel-audio which adds 3D positional audio to voxel games using the new HTML5 Web Audio API.
Our old collision code needed some major love and luckily Chris Dickinson was knowledgable in the realm of collisions and physics and whipped up a ton of super useful (for any game) modules: aabb-3d, collide-3d-tilemap, spatial-events and spatial-trigger. Chris also sent a bunch of pull requests to the various voxel core modules to integrate in his modules and make our collisions super awesome.
We event had Darius and Greg from Bocoup volunteer two entire work days to hack on voxel.js. Darius edits the site Build New Games and made some great contributions to the player physics code and Greg made an awesome heightmap module.
This week I have written a handful of new modules: city, which dynamically renders any area of San Francisco into a crude voxel world, highlight and script-gun. Here is a video of highlight in action:
I am most excited about script-gun though. From here on out I'm going to focus on making voxel.js an environment in which you can learn to program. Script-gun is my first attempt (the module itself is only about 50 lines of JS) at a WorldEdit style module in the browser. You can try the demo here and use some example scripts that I prepared here to get an idea of the possibilities. It will get more intuitive as time goes on, this is just the very first version.
What is next
Substack is currently implementing detached chunks so that you can build voxel space ships and robots that walk around but are still editable. He also has mentioned that he wants to make a space vacuum with cellular automata logic for hull breaches to enable space battles where you would have to patch your hull to contain air leaks. An early example of these detached chunks is in voxel-servo.
We both see so many awesome things that can be done with voxel games that Minecraft isn't doing at all and don't intend on porting Minecraft in any way to JS. We instead just want to make it easier to make your own game in the same style. To me Minecraft should be a category and not an instance. (note: Minecraft is a trademark of Mojang.)
The next thing I am going to build is an in-browser game editor so that you don't need to know how to use the command line in order to start making games with voxel.js. JSFiddle is a great example of a web based editor like this. I'm going to implement it in such a way that you can create a game and then get a URL to share with your friends so that they can play your game, fork it, and remix your game.
The newest version of Chrome Beta for Android lets you enable WebGL through about:flags and I have a demo called fps-touch-controls that adds touch screen controls to voxel.js. The controls are still wonky but it is definitely possible to play on a phone.
Raspberry Pi is also capable of running it... in theory. Back in August someone got Firefox OS to run with WebGL enabled on the Pi but I haven't been able to get the newer versions of Firefox OS to work. FFOS is nearing a 1.0 release so hopefully someone makes it easy to install FFOS on a Pi soon! Once that is well supported I have plans to buy 10 Pis and start doing pop up computer labs for kids to teach them programming through hacking on voxel.js. The Raspberry Pi Foundation and Mojang have actually been working on a Minecraft Pi Edition that is intended for education but it isn't out yet, will be very stripped down and won't be open source!
To stay up to date with the project you can follow @voxeljs on twitter or hang out in #voxel.js on freenode IRC. But more importantly you should go forth and create modules and games!
]]>A Proposal For Streaming XHR
Max Ogden
XHR2 isn't stream friendly. Lets explore why and propose a solution!
Note: This article predates the HTML5 Streams work
XHR2 (XHR is short for XMLHTTPRequest and is the HTTP client in AJAX) does some cool stuff. You can get binary response data, either read-only in a Blob or mutable in an Array Buffer (which you can turn into one of the many flavors of Typed Arrays). Binary data in JavaScript pushes the boundaries of the web by enabling rich multimedia experiences (like those demonstrated in this mind-blowing talk on the Web Audio API by @stuartmemo).
There is one fundamental problem with the current XHR specification (and implementations) which is that they aren't designed for real-time streaming, but with a few tweaks I believe they can enable a much better web experience.
Here is an example of trying to wrap XHR in the node.js Stream API. The important part of the following code is the write function which takes the Array Buffer that XHR returns, turns it into a Typed Array and then emits each new chunk of binary data each time that xhr.readyState 3 is fired.
var stream = require('stream')
var util = require('util')

function XHRStream(xhr) {
  stream.Stream.call(this)
  this.xhr = xhr
  this.offset = 0
  xhr.onreadystatechange = this.handle.bind(this)
  xhr.send(null)
}

// copy the Stream methods to this prototype
util.inherits(XHRStream, stream.Stream)

XHRStream.prototype.handle = function () {
  // readyState 3 will be fired many times during a large download
  if (this.xhr.readyState === 3) this.write()
  if (this.xhr.readyState === 4) this.emit('end')
}

XHRStream.prototype.write = function () {
  if (!this.responseArray) this.responseArray = new Int8Array(this.xhr.response)
  if (this.responseArray.byteLength > this.offset) {
    this.emit('data', this.responseArray.slice(this.offset))
    this.offset = this.responseArray.byteLength
  }
}

module.exports = XHRStream
Fundamentally what node Streams (and the above code) do is take a huge response that may take a loooooong time to complete (like downloading a Blu-ray DVD) and splits the response up into chunks. This is a beautiful pattern due to its simplicity. The programmer can decide if they want to combine the chunks and store them in a file or database OR if they want to process the chunks one at a time immediately and then throw the chunks away so that the JavaScript VM can clean the chunks up and free up the memory they were using. The xhr.response (xhr.responseText when getting non-binary responseTypes) in an XHR request is a single JavaScript object that just grows and grows and grows so if you are downloading a 5GB file you will have a 5GB JavaScript object in memory at the end of the request. The "node way" would be to have hundreds of small objects that each contain a contiguous chunk of the file that get emitted as soon as the client receives the data from the network.
The XHRStream prototype lets you write code that looks like this:
var xhr = new XMLHttpRequest()
xhr.responseType = 'arraybuffer'
xhr.open("GET", "http://bigdata.com/hugefile.zip", true)
var response = new XHRStream(xhr)

// 'data' events will happen each time a new chunk gets to the browser
response.on('data', function(chunk) {
  // chunk size in this case is determined by TCP and will
  // probably be in the range of 10s or 100s of kilobytes
})
Unfortunately this isn't possible with the current XHR implementation for two reasons. The first is that xhr.response is essentially one big buffer that keeps growing linearly as the response data comes in which means it can't get garbage collected. This just means you can't download files with XHR that are larger than the amount of RAM in your machine which isn't a total deal breaker for streaming data. The other reason is that currently the XHR spec prevents access to binary response data before the request has completed. Here is a simplified excerpt from the XMLHTTPRequest specification on w3.org (thanks to @tobie for assisting me in navigating the web standards world here):
If responseType is "text"
  If the state is not LOADING or DONE, return empty string and terminate these steps
  Otherwise return the text response entity body.
Otherwise (for all other types of responseTypes such as 'arraybuffer' or 'blob')
  If the state is not DONE, return null and terminate these steps.
Here is a discussion from the whatwg mailing list on this topic that contains this particularly insightful comment:
Hmm! And I guess it's very difficult to create a abstract in/out
interface that can handle any protocol/stream.
Although an abstract in/out would be ideal as that would let new
protocols to be supported without needing to rewrite anything at the
higher level.

--
Roger "Rescator" Hågensen.
I totally agree! It turns out that the node Stream API, which is the core I/O abstraction in Node.js (which is a tool for I/O) is essentially an abstract in/out interface that can handle any protocol/stream that also happens to be written in JavaScript.
It should be noted that websockets now support transporting binary data but the websocket spec still isn't perfect for streaming and the overwhelming majority of APIs are HTTP.
So, to any standards people or browser implementers reading this: please please please take some notes from Node.js and change the spec to allow for truly streaming data over XMLHTTPRequest.
]]>Scraping with Node
Max Ogden
Modules and tutorial demonstrating HTML parsing with node.js
One of the the best parts about server side JavaScript is the lack of the DOM, but sometimes you need to parse HTML in your node programs. For a while JSDOM has been the most well known module for accomplishing this task, but it has a number of issues. The author, @tmpvar, has been developing super awesome node powered robots instead of maintaining it. It also turns out that a full DOM level 3 implementation is super complex and crazy which means JSDOM suffers from some pretty bad memory leaks that leaves it unusable for a lot of complex use cases.
Instead of rewriting the DOM in pure JS, a more realistic approach is a nice and simple HTML parser that implements a CSS selector API. Enter cheerio, a module that can teach your server HTML.
Cheerio is built on top of the htmlparser2 module, a sax-like parser for HTML/XML. The goal of Cheerio is to implement most of the jQuery API in pure JS, without the need for a DOM. There is a separate dependency called cheerio-select that implements the sizzle API. The cheerio module itself more or less implements the jQuery API.
Using Cheerio
Since there is no DOM in node you have to initialize a cheerio instance from an HTML string. (this example comes from the cheerio readme)
var cheerio = require('cheerio'),
    $ = cheerio.load('<h2 class = "title">Hello world</h2>');

$('h2.title').text('Hello there!');
$('h2').addClass('welcome');

$.html();
//=> <h2 class = "title welcome">Hello there!</h2>
If you have an HTML file on disk that you want to load, you can use nodes fs module (warning: don't use sync calls inside an event loop, only use them when you don't care about performance):
var $ = require('cheerio')
var fs = require('fs')

var htmlString = fs.readFileSync('index.html').toString()
var parsedHTML = $.load(htmlString)

// query for all elements with class 'foo' and loop over them
parsedHTML('.foo').map(function(i, foo) {
  // the foo html element into a cheerio object (same pattern as jQuery)
  foo = $(foo)
  console.log(foo.text())
})
Similarly, you can use the popular request module to grab HTML from a remote server using HTTP and then pass it to cheerio:
var $ = require('cheerio')
var request = require('request')

function gotHTML(err, resp, html) {
  if (err) return console.error(err)
  var parsedHTML = $.load(html)
  // get all img tags and loop over them
  var imageURLs = []
  parsedHTML('a').map(function(i, link) {
    var href = $(link).attr('href')
    if (!href.match('.png')) return
    imageURLs.push(domain + href)
  })
}

var domain = 'http://substack.net/images/'
request(domain, gotHTML)
Building on the last example, here is how to fetch the raw binary data of each img on the page and render the images in your terminal using picture-tube and the node Stream API:
var pictureTube = require('picture-tube')

var randomIndex = Math.floor(Math.random() * imageURLs.length)
var randomImage = imageURLs[randomIndex]
request(randomImage).pipe(pictureTube()).pipe(process.stdout)

Now, go forth and scrape!
]]>Building WebView Applications
Max Ogden
Article version of this PhoneGap Day EU presentation given in September 2012
Summary: WebKit browsers are capable of a lot, but writing native code is still necessary for certain things. Hence: "hybrid apps". The web is a double edged sword. Openness on one side and splintered bugginess on the other. Most of the bugs I've encountered have been squashed in ViewKit, a jQuery mobile-esque UI library designed for mobile WebKits.
This is part two of a series, the first part is called Fast WebView Applications.
JS all the things!
My company (@gather) is a little under a year old and consists of 2.5 (two full time, me and @mikeal, and one design contractor, @objcts). Mikeal does all the backend... node, redis, couch, apple + google push notifications, load balancing, deployment, etc and I work on our mobile app. As covered in part one, we rolled with PhoneGap due to a) front end team size of 1 (with little to no iOS or Android experience) and b) a somewhat dogmatic belief in the open web and c) cross-platform.
So far mobile development has been an uphill battle. Not as bad as IE6 but it approaches the same level of facepalm. Here are some example commit messages to give you a sense of the day-to-day reality of cross platform development:

If you aren't already a super capable client side developer I would definitely not recommend attempting to make a high quality hybrid native app today. The community just isn't there yet. If you buy an iOS book you learn about the built in UI libraries and Interface Builder, have world class documentation, tons of google-able error messages and stack overflow posts, and generally lots of great example products in the App Store to draw inspiration from. PhoneGap gives you a blank white browser window and you take it from there. Fixing cross browser bugs, the entire UI for your app and custom native plugin functionality are all left as exercises for the reader.
It isn't that these things aren't possible. As HTML5 gets better and better these problems will disappear. But the state of mobile app development today is that the current JS UI framework offerings just don't compete with the UX of the native smartphone SDKs.
So if it is a pain, why are we doing it this way? The redeeming quality of the web is that the more work you pour into it, the more value you create in the ecosystem. Things like Firefox OS, which will allow mobile app developers to fork the operating system, are going to be huge wins. We just happen to be among the first on the bandwagon :)
Architecture
At the moment, our app has one set of front-end assets that run on most iOS (5.1+) and Android (2.3+) devices. We use native plugins to do only a few things: popup browsers for the OAuth login dance, date + time pickers for forms and push notifications. Our entire UI is just one big web view.
A few months into development I realized that I needed to abstract out a few of the UI components into a library so that I could make sure everything worked in all of the browsers that we aim to support. This library is called ViewKit and can be thought of as a WebKit specific jQuery mobile with way less features.

All in all we have five repos: ViewKit, our app specific front-end code that uses ViewKit, Android and iOS projects (that both symlink to the same front-end code), and our backend.
At the moment the only way to use Gather is to install the native app. We want to release a web-app version but haven't had enough time to do enough testing to feel good about a more wide release like that. The cool part is that when we are ready we would just serve the same application code in the above diagram directly from a static file server.
Development workflow
The majority of the app was written on my laptop in Chrome + its dev tools, the same workflow I've been using for years. Our designer, Michael Felix (@objcts) worked with us during the initial conceptual phase and then starting whipping up some pixel perfect PSDs.

On device testing is a must. Get a new Android + iPhone and an old Android and iPhone. We went with the Galaxy Nexus, iPhone 4S, some random LG android phone that runs 2.3 and an iPhone 3GS. Turns out nobody has really complained to us about iPhone 4.x compatibility so we are currently iOS5+6 only. Android emulators are a waste of time, just plug your device in. iPhone Simulator is nice though. With PhoneGap nowadays you can do pretty much everything from the command line:
      // get phonegap
      git clone https://github.com/apache/incubator-cordova-ios.git
      cd incubator-cordova-ios

      // create a new XCode project
      ./bin/create ~/src/gather-ios com.gather.gather Gather
      cd ~/src/gather-ios

      // compile app
      ./cordova/build

      // run in simulator
      ./cordova/emulate

      // get an .ipa for ad-hoc (testflight) or app store distribution
      gem install shenzhen && ipa build
or for Android:
      // get phonegap
      git clone https://github.com/apache/incubator-cordova-android.git
      cd incubator-cordova-android

      // create a new Eclipse project
      ./bin/create ~/src/gather-android com.gather.gather Gather
      cd ~/src/gather-android

      // generate an .apk and run it on a plugged in phone
      ./cordova/BOOM

Cross-platform code
On app load we first execute all of the common, platform independent JS and then do a bit of UA sniffing (using zeptos $.os plugin) to load browser + platform specific scripts. These scripts include things like the required cordova.js library (which at the time of this writing has specific builds for specific platforms), our phonegap plugin JS files, and any browser specific polyfills. We also have a iOS specific stylesheet that currently has a single line to enable -webkit-transform animations (they are disabled by default because Android animation performance is abysmal).
There are a few other places in the app where we have platform specific code. Here is a snippet from our date picker code that executes after you choose a date or time (or both) in the native date picker UI popup dialog:
      if ($.os.ios) {
        $('.datepicker').text(moment(start).format("MMM Do h:mma"))
      } else {
        $('.datepicker').text(moment(start).format("MMM Do"))
        $('.timepicker').text(moment(start).format("h:mma"))
      }
iOS has a combination date + time picker in a single dialog but Android offers only date or time but not both, so we have to add a new input field for Android users and branch a few times in the code to handle both platforms correctly.

Networking and real-time
Since the app is just a WebView I just use XHR for most things. We wrote a RESTy JSON API in node for doing things like authentication, retrieving user data and posting new data, etc. Since our API has CORS turned on I can use Chrome on my laptop to develop directly against our production servers over SSL to make sure everything works. This speeds up development workflow dramatically because mobile debugging is a pain.
The latest (and unfinished) thing we've been working on is a real time chat in the app built with socket.io, a popular cross-browser node powered real time abstraction. In my experience so far socket.io is a bit too monolithic and ends up being a pain to debug and configure. It doesn't implement things like the node Stream API but instead has it's own connection state API and automagic reconnect logic. When it works it works great but when it doesn't you have to ask the socket.io team for assistance. The next version of socket.io (currently in development) is supposed to fix lots of these issues but it isn't done yet :(.
In order to actually transmit data over websockets on mobile there are a couple of requirements: a) wss:// is a must because normal ws:// messages sometimes randomly get lost by poorly implemented mobile carrier proxies, b) you have to be able to handle the wss:// encryption overhead on your server (equivalent to https://). In node right now SSL is 10X slower than non-SSL so this can be a deal breaker (SSL speed is a priority for the node team but OpenSSL is hard).
Due to the limited wss:// support in mobile browsers (pretty much only iOS) we have just been forcing socket.io to use its XHR polling transport because XHR works everywhere. If I had to re-write the whole chat feature again from scratch I would probably just use a custom XHR polling transport or shop around for something way more focused and simple. However, socket.io will be awesome when we release a webapp version of Gather because ideally we wouldn't have to worry about as many cross browser + desktop issues. Both solutions have tradeoffs. I'd love to hear others experience with the open source real-time web on mobile!
Fluid + responsive design
This might sound fancy but it just means that you should make your web app look good on different screen sizes. I employ three techniques with Gather to make sure the app works on all the random Android phones it gets installed on: fluid css (for slightly different screen widths and heights), sprites (for different pixel densities) and responsive design/media queries (for drastically different screen widths and heights). I'm not gonna go into detail here (since there are tons of better sources for info on these techniques) other than on two points: css flexbox is awesome (even though the spec is in flux) and glue is super great for creating sprites.
We don't officially tablets yet but the app is at least somewhat usable on them without any modifications -- the buttons are just kind of small. It wouldn't be that much work to put in a media query and tweak the css, I just haven't gotten around to it.
Native plugins
As I mentioned earlier, there are a few places where we use PhoneGap plugins. Plugins are designed so that they expose a single JS API and then offer a number of platform specific native code implementations. That way you can write your JS once and then use the .java plugin for Android or .h and .m files for iOS. Another awesome thing about PhoneGap plugins is that it is a way to prototype experimental W3C APIs via native polyfills. The date picker shown above is a native plugin.
For bringing up pop-up browser windows we use a popular 3rd party PhoneGap plugin called "child browser". This plugin is soon changing its name and moving into PhoneGap core. On iOS I wasn't happy with the default child browser UX so I wrote a API compatible alternative that is based on the UX of the iOS Facebook SDK (pictured below on the right). It's available here. The picture on the left is the same JS API running on Android to generate a web browser overlay written in Java using the Android SDK.

Push notifications are one of the biggest reasons we aren't a web app. There are some nice plugins for both iOS and Android to handle registering devices for push notifications and getting device tokens than you can send to your server and use to send push notifications later. At the moment the APIs are different between the two platforms but there is some work happening now to standardize the JS API for registering a device and receiving a push notification across all platforms that offer push notification functionality. There is a plugin for Android called StatusBarNotification that lets you send messages to display in the Android status bar (as pictured below on the left). The JS API actually polyfills the Web Notification API from the W3C, which is a big win for future proofing our app.
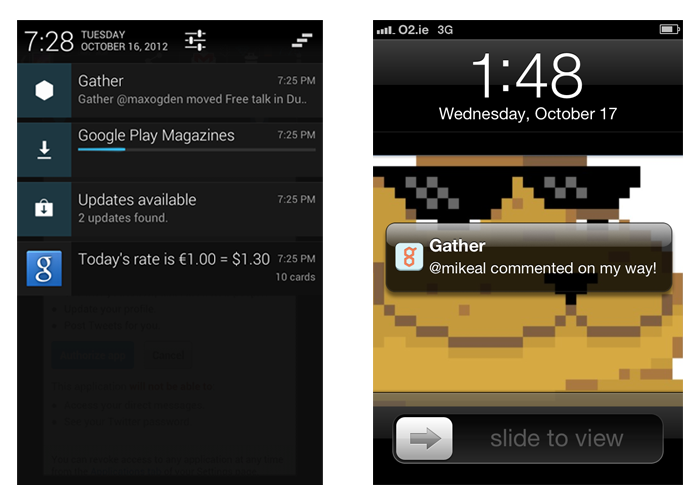
App Stores
Submitting to the Android Play marketplace is pretty straightforward and once you upload your app it only takes between 30 minutes and 6 hours for it to become available for download. iOS, on the other hand, usually takes 1-2 weeks for app review and involves an insanely complicated certificate signing and device provisioning process. Be prepared to search stack overflow for obscure XCode generated errors and find answers that tell you to delete your entire XCode project and start over from scratch.
We've been using Testflight for beta testing. It is worth checking out and simplifies the process of distributing beta builds to authorized beta testing devices (that you have to manually add to the Apple developer portal). Unfortunately there is no API for a lot of the Apple developer portal so there are a lot of manual processes involved in distributing iOS apps.
Future plans
There are two things that aren't here yet but are super exciting. One is the ability to programmatically install native plugins in the same way that you can type `npm install foobar` to get modules in node. The PhoneGap team is working on this and it will make development way easier, as well as enable the PhoneGap user ecosystem to really blossom (just look at what NPM did for node).
The other thing is doing remote updates. Since PhoneGap apps are just a bunch of dynamic code you can easily write a Google Chrome style autoupdating capability into the apps as a way of circumventing Apples crazy long review process. There are definitely guidelines from Apple that you can't break (bait and switch -- changing your apps UI so that it suddenly shows naked people), but for things like fixing JS bugs and making minor updates to libraries, templates and stylesheets this kind of remote update functionality is going to be super awesome.
In Conclusion
Don't use PhoneGap if you aren't willing to get down and dirty and help establish some good patterns for hybrid mobile app development. It is still the early days. But the idea that you can use the open web stack to write nice mobile phone apps isn't crazy. After going through the process I would say I did about 80% web, 10% iOS and 10% Android. Would I have been able to achieve the same goals with me doing 50% iOS and 50% Android? I couldn't tell ya! I'm just happy that I got to keep writing JS without sacrificing too much in terms of quality.
]]>Fast WebView Applications
Max Ogden
Article version of a JSConf Argentina presentation given in May 2012
tl;dr
Embedded mobile WebViews have bad default behaviors that result in slow applications. To help fix the bad defaults I started some new libraries, ViewKit and masseuse.js, and found some helpful libraries written by others. Additionally, all of the specific things covered in this article have associated code examples available in https://github.com/maxogden/fast-webview-applications-presentation
Why not go "full native"?
Having been recently tasked with writing an iPhone application I found myself at a fork in the road. Going down the path of Objective-C meant diving head first into a painful world of static typing, subclassing, IDEs, closed source frameworks and cultish fanaticism. The other path, JavaScript and HTML5, is one I have been working with every day for years. For me the natural choice would be to work with the tools I knew best, but I also recognized that most developers who write iPhone applications choose Objective-C so there would be a lot (see: tons) of rough edges along the road less traveled.
Cordova
I ended up using Cordova (formerly PhoneGap). The name Cordova comes from the street in Vancouver, Canada that was home to the software developers who built the framework, but the project's goals actually remind me a lot of the Spanish city of Cordoba (Cordova is actually the English form of Cordoba according to Encyclopedia Britannica). Around 1000 years ago Spain was filled, like much of pre-enlightenment western Europe, with people who got all of their information from the church. Then Muslims from northern Africa started moving into southern Spain and spread their ideology: to seek knowledge through science. Cordoba quickly became the most incredible city in the world with paved streets, street lights (gas powered), public hospitals, universities, medical schools, restaurants and the world’s largest library.
The whole Objective-C vs JavaScript debate is a modern version of what happened in Spain back in the day. Then: The church delivered the facts and you weren't encouraged to modify them. Now: Apple delivers SDKs and developers aren't allowed to modify them. Then: Cordoba made giant leaps and bounds due to a culture of open science. Now: JavaScript has created of the largest open source projects and fastest growing package repositories.
Contemporary Muslims who bring up the memory of Cordoba typically do so either to emphasize the need for a new Islamic scientific and industrial renaissance, or to emphasize the need for a multi-cultural and tolerant society.
— via
Cordova gives you a nice platform to build HTML5 iOS apps on top of. Essentially Cordova wraps a full screen WebView in a native app 'container' so you get nice things like the ability to call from JavaScript into Objective-C to do things like send and receive push notifications, take photos, integrate with SDKs (Twitter and Facebookfor example), etc. At the end of the day, though, most of your time will be spent working on the HTML, CSS and JS that runs in that WebView. The harsh reality is that where Apple ships both the platform and the UI framework together, Cordova is just the platform. You are expected to BYOUI.
Even though Cordova implements the same core JS API across many platforms many mobile developers will tell you a bigger issue is that WebKit is turning into the new Internet Explorer: huge fragmentation in the Android market and a we-do-whatever-we-want attitude at Apple means it's not realistic to expect the code that runs in a WebView on iOS5 to run on iOS4 or an Android browser. Because of these issues I decided to first target iOS5 and then port to other platforms later.
There are a few big frameworks for iOS like jQuery Mobile and Sencha Touchbut having built web apps with them in the past I always felt too constricted by their monolithic approach. Instead, I prefer a small modules loosely joined approach.
Touch Events
The first thing you'll want to do is speed up your clicks. By default
in WebViews there is a ~300ms delay if you are responding to click events.
This is for capturing certain gestures like double tap to zoom in. Since
we are in a viewport controlled unzoomable application container we don't
actually want this behavior but sadly there is no easy way to disable this
and make clicks fast again. touch events, on the other hand,
have no artificial delay. Google has offered up one solution to this problem but
I find their approach requires tight coupling between events and DOM elements.
Rather than having a 1:1 ratio between DOM elements and their associated
event listeners I instead use a few global listeners that aren't tightly
coupled to any specific DOM elements.
masseuse.js is a library I wrote that includes all of the touch related helpers (in a less contrived form than this post) that I developed while working on my application.
Strange default behavior.
The numbers shown are a rough calculation of the time between when the
user's finger touches the screen to when the associated click event
finishes firing.
Beyond the click delay there are also certain CSS properties enabled in WebViews that can create a confusing UX (as you can see in the above video). Here's a rundown (via the PhoneGap wiki):
* {
  /* prevent callout when holding tap on links (the native dialog that comes up) */
  -webkit-touch-callout: none;

  /* prevent webkit from resizing text to fit */
  -webkit-text-size-adjust: none;

  /* make transparent link selection, adjust last value opacity 0 to 1.0 */
  -webkit-tap-highlight-color: rgba(0,0,0,0);

  /* prevent copy paste, to allow, change 'none' to 'text' */
  -webkit-user-select: none;
}

// turn off webkit checkbox style, works for other inputs too
input[type="checkbox"] { -webkit-appearance: none; }

// placeholder text opacity
input::-webkit-input-placeholder { opacity: .8; }
To fix slow touches you must turn off click events for each
kind of element that needs to be fast:
$('a').live('click', function(e) {
  e.preventDefault()
  return false
})
To replace clicks you can use the tap abstraction from zepto.js
to handle touch events:
$('a').live('tap', handleTaps)Since we are disabling click we are also throwing away the
native behavior that we get from click events (focus for inputs,
href changes for anchor tags, checkbox checking, etc) so we will have to
re-implement that behavior in javascript. To implement this for anchor
tags in a very rudimentary way:
function handleTaps( event ) {
  window.location.href = $(event.currentTarget).attr('href')
}
Fast clicks and CSS disabling in action
Zepto
Zepto is a jQuery API compatible library designed specifically for WebKit so it is smaller and much more easy to read because it doesn't aim to support every weird browser under the sun. It also has some nice mobile specific modules like gesture and touch.
Templating and Routing
Client side templating is good for mobile apps, as you wouldn't want to fetch remote templates over a wireless connection.
There are a ton of templating and routing engines out there, so you can pick whichever one you like! I happen to use mustache.js and director.js because they are nice and simple. Here's a simple example:
// render a template and insert it into the dom
function render( template, target, data ) {
  target = $( target ).first()
  target.html( buildTemplate(template, data) )
}

// gets templates out of hidden <script> tags in the DOM:
function buildTemplate(template, data) {
  return $.mustache( $( "." + template + "Template" ).first().html(), data || {} )
}

var routes = {
  cats: function() {
    var cats = ['aristotle.png', 'bikecat.png', 'awesomecat.gif', 'walkingcat.png', 'seriouscat.png']
    render('gallery', '.content', {pictures: cats})
  },
  dogs: function() {
    var dogs = ['hellodog.png', 'shopdog.png', 'bearddog.png', 'coco.png']
    render('gallery', '.content', {pictures: dogs})
  }
}

// Router is provided by Director
Router({
  '/': {
    on: function() { window.location.href = "#/cats" }
  },
  '/:page': {
    on: function(page) {
      routes[page]()
    }
  }
}).init('/')
The above code in action.
To get the fixed header and nice scroll behavior of the content div in the above: as of iOS5 you can use CSS to assign native scroll behavior to a DOM element:
.content { -webkit-overflow-scrolling: touch; }To get this behavior on pre-iOS5 WebViews you have to use JS libraries like iScroll. I personally have found most of these libraries to be very clunky to work with.
Sprites and Retina Images
When testing on device I noticed significant latency when loading images from the filesystem. Given the following CSS, when you tap on an input it will focus before the image loads and appears, which makes the app feel slow.
input { background-image: url('images/text.png') }
input:focus { background-image: url('images/text-focus.png') }
Image load time in the simulator. On actual devices it is even more noticeable.
If you look closely at the icons in the input fields you'll see that they are grainy, as the simulator in that video is simulating a retina display. To support retina devices I would have to have a copy of each CSS rule inside of a media query:
@media only screen and (-webkit-min-device-pixel-ratio: 2) {
  input { background-image: url('images/text@2x.png') }
  input:focus { background-image: url('images/text-focus@2x.png') }
}
This isn't very maintainable as it would double the amount of CSS required to show images. Instead, I create sprites using the glue utility:
glue images/ . --simple --algorithm=verticalThis will give me a single sprite png as well as CSS rules based on the filenames of the original images from within the sprite, so now my CSS looks like this:
.sprite {
  background-image: url(sprite.png);
  background-repeat:no-repeat;
}
.sprite.text { background-position:0px 0px; }
.sprite.text:focus { background-position:0px -40px; }

@media only screen and (-webkit-min-device-pixel-ratio: 2) {
  .sprite {
    background-image: url('sprite@2x.png');
    background-repeat:no-repeat;
    background-size: 40px 160px;
  }
}
Now I don't have to re-define each element with a sprite inside of the
media query -- I only need to swap out all elements with a sprite class
on them with the retina sprite. The small caveat here is that I have to
add the sprite class to each element in the markup that uses
a sprite for it's background image:
<input type="text" name="name" class="text sprite" value="" placeholder="Name">
With the retina sprite enabled. Again, on an actual device the improvement is much more noticeable.
There are lots of WebView quirks not related to performance that I will save for another blog post.
]]>Node Streams: How do they work?
Max Ogden
Description of and notes on the node.js Stream API
There is also a screencast version of this article.
UPDATE: new information about Node >= 0.10
Since writing this blog post (back in the Node 0.6 days) there have been major changes made to the Node Stream API. In Node 0.10 a new version of Streams called Streams2 were released. Here is a summary of using Streams2.
how to destroy/end streams in node >= 0.10
- usually you call
.destroy()if it has.destroy - if it doesnt have
.destroyyou are out of luck and the stream should upgrade to use e.g. newerthrough2 - in request you call
.abort()(this should get fixed to use.destroy())
what about close, end
- usually no
.closemethod exists except in FD backed streams (usually onlyfs). usually you would never call.close() -
.end()tries to end the stream gracefully
what about events
-
finishevent is emitted when a stream ends nicely (e.g.stream.end()) -
closeanderrorevents are emitted when a stream ends due to failure (e.g.stream.destroy()) -
endis emitted when a readable stream has no more data -
endin streams2 behaves more like a flush event, it only gets emitted when the data has been read from the readable
Why Streams?
node bills itself as JavaScript evented I/O. In a nutshell that means if you are trying to solve a problem that is I/O bound (the limiting factor is reading/writing to relatively slow interfaces) then node can provide some useful abstractions to you. An example is if you are writing an application that has to talk to multiple databases, a caching layer, a load balancer, external web services, mobile clients, third party auth providers and serve web applications then node acts as a nice glue between all of the things.
"Streams in node are one of the rare occasions when doing something the fast way is actually easier. SO USE THEM. not since bash has streaming been introduced into a high level language as nicely as it is in node."
-@dominictarr in his high level node style guide
What are Streams?
The main tool in node's evented toolbox is the Stream.
Stream instances are basically Unix pipes. They can be readable, writable
or both and are easy to reason about -- you can pipe a readable stream
to a writable stream by doing readableStream.pipe(writableStream).
Readable
Readable streams will emit data events each time they get a
"chunk" of data and then they will emit end when they
are all finished. emit (from EventEmitter)
is the observer pattern - a publish/subscribe pattern which allows a number
of observer objects to see an event. Different types of streams will have
different ways of chunking up their data. For example, a library that reads
CSVs might emit data every time it reads a new line whereas
an HTTP request might emit data every few kilobytes during the
download.
Readable streams can also be paused and resumed, and it's up to the Stream
implementer to write the pause() and resume() methods.
Pause is intended to be an advisory API meaning when you call it you are
telling the stream to stop emitting data events but you may
still receive some data events after you call pause because
certain things may already in-flight, or between states at the
moment you called pause.
Writable
Writable streams must implement two functions: write and end.
When you write data to a writable stream it will return either true or false. true means cool, keep sending more data with write and false means Uh-oh I am backed up -- don't write any more data until I emit drain.
This is a form of back pressure which is a very powerful feature
as it lets stream communicate "upstream" to their writers. Most
of the back pressure related APIs are advisory so there is sort of a gentlemens
agreement to honor requests to start or stop writing as timely as possible.
However, since they are advisory it means a writable stream may still receive write calls
after it returns false.
Streams on the client
After working with node for a while I came to love the Stream API ( and I'm not the only one) but sorely missed it when I had to deal with the variety of I/O bound APIs in the client side realm. Some examples of these are XHR, WebSockets, IndexedDB, WebWorkers, WebRTC, and DOM Events (mouse, touch, etc). Wouldn't it be great if you could use the same node style Stream semantics to interface with all of these things? Unfortunately it seems that standards bodies have instead implemented their own (usually inconsistent or poorly done) streaming semantics for the client.
I thought it would be useful to write something like fingerSwipe.pipe(webSocket) (pseudo-code
for detecting swipe touch events and streaming them to the server
as they happen over a WebSocket connection) so I started a project called
domnodewhich intends to wrap common I/O bound APIs in node style streams
so that you can render them into the DOM easily.
There is a magical project by @substack called browserifythat makes domnode possible. It lets you write code in client side JS that looks like node code:
var stream = require('stream')
var util = require('util')

function XHRStream(xhr) {
  stream.Stream.call(this)
  xhr.onreadystatechange = function () { me.handle() }
  xhr.send(null)
}

util.inherits(XHRStream, stream.Stream)
The best part about browserify is that it avoids reinventing the wheel/not invented here by letting you use the pure JavaScript parts of node or thousands of third party modules while maintaining node's simplified require API. Since browserify uses node's source code verbatim you get to use the node documentationas well as the multitude of related information floating around on the internets to look up how these things work.
@dominictarr contributed a Stream wrapper for Socket.io called browser-stream that nicely integrates with domnode so you can emit things from node and rest assured that they will make their way into your web app.
Streams.next
As wonderful as streams are today, they can definitely use some improvements. @izstells me node v0.9 is going to feature a major Stream overhaul to make the API even more unified. When node started it created a few domain specific evented I/O abstractions for things like the filesystem or TCP and then later, around 0.4, it consolidated them into the Stream API we have today, but there are still some vestigial phantoms lurking around.
One of the major blemishes is the collection of methods used end a stream. destroy() initiates
a forceful end to a stream, whereas destroySoon() and end() both
wait for the current data to finish buffering. end() and destroySoon() came
from different parts of node originally but after being consolidated into
Streams they have some overlap and can probably be redesigned.
There is also some confusion between the close and end events. end means no more data will be emitted but if this stream is also writable it should stay open for more writes if they need to happen and close means whatever this thing was tied to, it's done now. you may dispose of it, it's gone.
Close comes from the fs.close() method and end is tied to the end() function
on Streams and as you can see these can probably be refactored.
Another possibility is that streams will get automagic buffering. This means that if you create a writable stream but haven't yet piped it anywhere then it will buffer any data you write to it and then emit that data when someone asks for it later. This same behavior will be available if you pause a stream and then resume later. Currently you have to roll your own buffered stream implementation or use a generic third party module like BufferedStreamby @mikeal.
Code examples
Simplified writable stream
var writestream = new stream.Stream()
writestream.writable = true
writestream.write = function (data) {
  return true // true means 'yes i am ready for more data now'
  // OR return false and emit('drain') when ready later
}
writestream.end = function (data) {
  // no more writes after end
  // emit "close" (optional)
}

writestream.write({number: 1})
// note: in node core data is always a buffer or string
Simplified Stream.pipe() implementation
var readstream = new stream.Stream()
readstream.readable = true

readstream.on('data', function(data) {
  var ready = writestream.write(data)
  if (ready === false) {
    this.pause()
    writestream.once('drain', this.resume.bind(this))
  }
})

readstream.on('end', function() {
  writestream.end()
})Gut: Hosted Open Data Filet Knives
Max Ogden
HTTP Unix pipes for Open Data
Not Invented Here
A topic that has fascinated me for years now is (broadly speaking) nationalism. In the world of the internet that essentially boils down to something like "I am a Python programmer and this project is written in Java! Ignored!". It is this behavior (which I see a lot in programming, mostly manifested as "Not invented here") that leads to a bunch of solutions to the same problem written in a bunch of different languages where many of the solutions are half-baked.
For a concrete example consider open data catalogues. As evidenced by datacatalogs.orgthere are a ton of different solutions to the same set of problems, namely hosting open data. Having a rich ecosystem is a good thing, but I believe that there is a common open data infrastructure layer that we aren't maximizing our collaborating on: the conversion of data between different formats.
Wouldn't it be great if I, as a Javascript developer, could use the awesome data conversion libraries available in Java like Apache POI? Or if Ruby developers could use Python packages like csvkit (which contains the super useful csvclean utility). The good news is that the internet has settled on a common language for crossing these language barriers: HTTP and JSON. Additionally, nowadays the web is filled with hosted services (see SaaS, PaaS). There are numerous platforms where hosted services can be deployed for free (Google App Engine, Heroku, Dotcloud, Nodejitsu, etc).
Unix pipes
On the Unix command line there are a bunch of useful single purpose utilities.
The Unix philosophy is "write programs that do one thing and do it well. Write programs to work together. Write programs to handle text streams, because that is a universal interface".
The Unix command wc is a great example. You give it a bunch
of text and it will count the number of words, lines and characters. Combined
with the cat command, which reads and file and dumps out all
the text, you can use a Unix pipe (the | character) to 'pipe' the data
that cat dumps out into wc:
cat awesomeText.txt | wc
21      55     507
What is gut
Taking heavy inspiration from unix pipes, HTTP and JSON I have come up with a modest proposal for how we might share our best tools for various data conversion jobs as hosted web services. I'm calling it gut, as in gutting a fish and getting the yummy filet out while leaving behind all of the junk.
Here's a simple example of how a gut server would work that takes in a CSV file and returns JSON data. As a developer using the gut server to process my CSV file I would send the following HTTP request containing my CSV data:
POST / HTTP/1.1
User-Agent: curl
Host: gutcsv.nodejitsu.com
Accept: */*
Content-Length: 64
Content-Type: application/x-www-form-urlencoded

name,appearance
chewbacca,hairy
bill,nonplussed
bubbles,relaxed
This is what the gut server would give me back:
POST / HTTP/1.1
host: gutcsv.nodejitsu.com
content-type: application/json
content-length: 186
Connection: close

{
  "headers": [
    {
      "name": "name"
    },
    {
      "name": "appearance"
    }
  ],
  "rows": [
    {
      "name": "chewbacca",
      "appearance": "hairy"
    },
    {
      "name": "bill",
      "appearance": "nonplussed"
    },
    {
      "name": "bubbles",
      "appearance": "relaxed"
    }
  ]
}
Essentially I am piping data from my computer through a gut server and when it comes back it is in the new format. In this example I used the node.js hosting platform Nodejitsu to deploy my CSV-to-JSON code so that it is available to anyone in the world who can make an HTTP request.
Voltron, assemble!
If you are writing code that converts data from one format to another, consider also exposing your solution in the form of a gut server! Last year I had great success at International Open Data Day teachin ScraperWiki because it scaled out well to a room full of people with different programming backgrounds. I think that writing these lightweight data converters/massagers/transformer servers is also a task that anyone can tackle in a short amount of time.
There is a Github project that contains the current gut servers that I have been working on and also a wiki pagewhere you can add your gut server to the list. Once there are a handful of gut servers we can start working on more extensive discovery and testing tools (ensuring gut server availability, better documentation, web based gut server API playground, etc).
]]>Little Coders
Max Ogden
Elementary school programming
My first foray into programming was in 1999 and happened accidentally inside the Starcraft custom level editor. I would sit, fully immersed in a paracosm, and create complex storylines that the player could play through, one small objective at a time. You could specify, for instance, that if a Zergling walks onto a particular platform then an event should trigger. You could subscribe other elements of the game to listen for events on that platform and perform other callbacks. I was getting exposed to event based publish/subscribe asynchronous programming without realizing it.
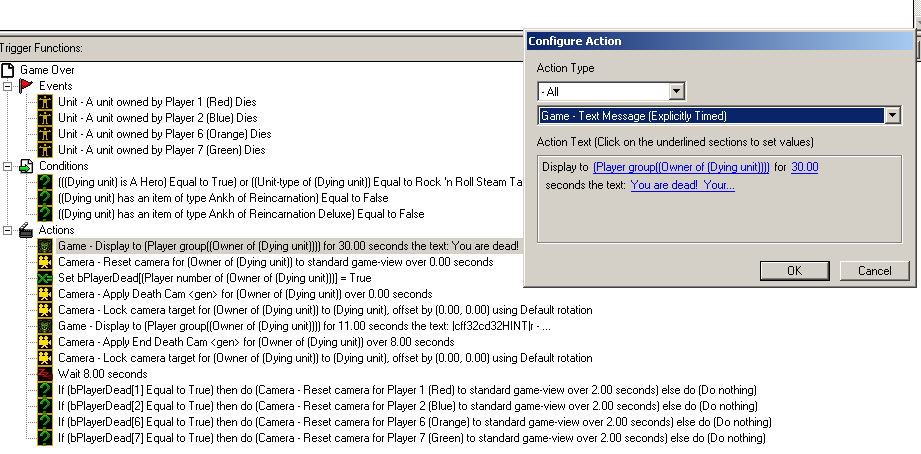
triggers inside a Starcraft scenario
When my older brother asked me how to get his nine year old interested in programming, I told him to look for a programming environment that sacrifices practicality for imagination. Nine year olds aren't worried about vendor lock in or job security, they are only going to get hooked if the feel like they are playing a video game (in my case with Starcraft I was literally playing a video game). A good example of this mentality is Hackety Hack by _why the lucky stiff. Hackety Hack aims to "offer a place for plainspeople to tinker with code". Here is a wonderful video from the Art && Code Symposium where _why talks about his thoughts on programming education for youngsters and shows off Hackety Hack. Highly recommended viewing.
Near the end of the above video, _why describes a card game called Kaxxt that is designed to get little coders introduced to fundamental programming concepts. At it's core Kaxxt is about robots, lazers and pyramids. What nine year old wouldn't want to play that? When kids play this game they get exposed to ideas such as enumerability or thinking recursively, much in the same fashion that The Little Schemer tries to "present abstract concepts in a humorous and easy-to-grasp fashion". The Flash game Lightbot also comes to mind. In Lightbot, you visually program an animated robot through a series of puzzles. It seems that robots and lazers may be the key to connecting with today's youth.
Sadly, _why mysteriously stopped contributing to his projects at some point in 2009, leaving many orphaned works behind. His projects have been adopted by various open source community members. Steve Klabnik recently quit his job to courageously follow his heart and work on Hackety Hack full time. Similarly, Joey Hess then took the liberty of creating an alpha, playtestable version of Kaxxt that uses the pieces from the board game Icehouse. His port is called 'Kaxxt on Ice'
There are also a few notable academic programming education efforts. Greenfootis designed to teach kids Java. There is an entertaining series of postsfrom a programmer who tried teaching his nine year old daughter how to program using Greenfoot. Google has been lightly researching alternative curriculum designs through their Google for Educators program. As described by Google's director of education relations in the tech talk "Initiatives in Education", Google has been working on "integrating computing curriculum across K-12 core subjects". They also recently donated 2 million USD to Sal Khan's Khan Academy, which offers a staggering amount of free, digestible education lectures.
MIT's Scratch and Carnegie Mellon's Alice seem to each have years of development poured into them, as well as some friendly competitionand actual in-classroom testing. At first glance, both Scratch and Alice appear deep and involved, much like a complicated programming IDE. I would personally like to see more lightweight artistic interpretations, mockups and spikes of the PhD level programming educational research that is happening between Google, MIT, Carnegie Mellon and elsewhere. In the Hackety Hack Manifesto it is explictly stated that"IDEs are a disaster. Newbs should see only one non-scary window free of tree controls and pinned windows and toolbars. As such, we want to stay away from project files and makefiles, the trappings of an IDE."
As part of my fellowship with Code for America in 2011 I will be working with the city of Boston on software to improve public school education (more details here). I am excited at the prospect of getting to meet those working on Scratch at MIT or researchers from the Concord Consortium.
]]>